Contents
Next.js internationalization (i18n) tutorial

In today's digital era, where technology seamlessly bridges distances between people and cultures often with just a few clicks, opting to make your website multilingual seems to be a very reasonable choice. This strategy not only opens doors to global markets but also attracts new clients, thereby significantly increasing the chances of success for your business.
In this post, we are going to show you how to internationalize (i18n) your Next.js website using one of the most popular localization libraries, React Intl. This post will demonstrate localization in both routing approaches: the App Router and Pages Router. It will also explain how to automatically detect a user's preferred language, how to add necessary hreflang tags for better SEO, how to determine text direction, and much more. So, let’s dive in and make your website globally friendly!
All code samples used in this section are available on the GitHub repo.
Create a new Next.js project
What better way to begin than with a fresh new project? To create a new Next.js project, we will use the create-next-app CLI tool. This tool is maintained by the creators of Next.js and will make the creation process easier for us. By running the command below, we will create a new Next.js project called nextjs-app-router-i18n-example in a directory with the same name.
npx create-next-app@latest nextjs-app-router-i18n-example
Since this command operates in interactive mode, we will opt for the default settings for the purposes of this tutorial.
Would you like to use TypeScript? [Yes]
Would you like to use ESLint? [Yes]
Would you like to use Tailwind CSS? [No]
Would you like to use `src/` directory? [Yes]
Would you like to use App Router? (recommended) [Yes]
Would you like to customize the default import alias (@/*)? [No]
Add React Intl dependency
Next.js is compatible with a wide range of i18n libraries, including react-intl, lingui, next-intl, among others. In this post, we've chosen to use React Intl because of its widespread adoption and advanced features, such as ICU syntax support. To incorporate it, let's navigate to the nextjs-app-router-i18n-example directory we previously created and install react-intl.
cd nextjs-app-router-i18n-example
npm i react-intl
Add config for internationalized routing
Configuring internationalized routing in apps based on App Router is not completely automated and requires a bit of manual work. To start, let's first create an i18n-config.ts file in the root of the project and fill it with our i18n configuration. The locales represent the list of locales we would like to support in our app, and the defaultLocale represents the default locale of the app, and the one that will be used when visiting non-locale-prefixed paths.
The i18n-config.ts file:
export const i18n = {
  locales: ["en", "ar", "fr", "nl-NL"],
  defaultLocale: "en",
};

export type I18nConfig = typeof i18n;
export type Locale = I18nConfig["locales"][number];
After creating the configuration file, the next step involves updating the app directory to support internationalized routing. To accomplish this, we need to put all page files within the [locale] directory. That way, app pages will have access to the currently used locale and be able to display appropriate localization messages.
nextjs-app-router-i18n-example
|-- public
|-- src
|   |-- app
|   |   |-- [locale]
|   |   |   |-- globals.css
|   |   |   |-- layout.tsx
|   |   |   |-- page.module.css
|   |   |   |-- page.tsx
|   |   |-- favicon.ico
|-- ...
|-- i18n-config.ts
|-- next.config.js
|-- package.json
|-- package-lock.json
Create localization files
When it comes to localization files, it's good practice to put them all in one place. That way, it would be easier later for us to search and update any translation. To do this, let's create a folder named lang inside the src folder of the project. Inside it, add four JSON files named ar.json, en.json, fr.json, and nl-NL.json. These files will contain the translations for Arabic, English, French, and Dutch (Netherlands), respectively.
After creating these files, proceed to populate the localization files with the messages that will be used later in the project.
The ar.json file:
{
  "common.footer": "دروس التدويل",
  "page.home.head.title": "مثال على Next.js i18n",
  "page.home.head.meta.description": "مثال Next.js i18n - عربي",
  "page.home.title": "مرحبًا بك في <b> البرنامج التعليمي Next.js i18n </b>",
  "page.home.description": "أنت الآن تستعرض الصفحة الرئيسية بالعربية 🚀"
}
The en.json file:
{
  "common.footer": "internationalization tutorial",
  "page.home.head.title": "Next.js i18n example",
  "page.home.head.meta.description": "Next.js i18n example - English",
  "page.home.title": "Welcome to <b>Next.js i18n tutorial</b>",
  "page.home.description": "You are currently viewing the homepage in English 🚀"
}
The fr.json file:
{
  "common.footer": "tutoriel d'internationalisation",
  "page.home.head.title": "Next.js i18n exemple",
  "page.home.head.meta.description": "Next.js i18n exemple - Français",
  "page.home.title": "Bienvenue à <b>Next.js i18n didacticiel</b>",
  "page.home.description": "Vous consultez actuellement la page d'accueil en Français 🚀"
}
The nl-NL.json file:
{
  "common.footer": "handleiding internationalisering",
  "page.home.head.title": "Next.js i18n voorbeeld",
  "page.home.head.meta.description": "Next.js i18n voorbeeld - Nederlands (Nederland)",
  "page.home.title": "Welkom bij <b>Next.js i18n zelfstudie</b>",
  "page.home.description": "U bekijkt momenteel de homepage in het Nederlands (Nederland) 🚀"
}
Configure react-intl in Next.js project
Configuring React Intl with Next.js largely depends on how localization messages are used and whether they need to be accessed on the server side or the client side. Knowing that Next.js is a highly flexible framework, and that typical usage mostly combines both server-side and client-side approaches, in the following sections we will cover both approaches in more detail.
Server components
The use of server components in Next.js offers several advantages, such as the ability to render UI components on the server, reduce the time needed to fetch data for rendering, enable caching, and perform other related tasks. However, these components differ from traditional client-side components because they lack access to certain React features, such as context providers and side effects.
When it comes to using the React Intl library for server-side rendering, an alternative method must be employed to access localization messages since this library relies on the provider pattern. To overcome this limitation, we will create a lib directory in the src directory of the project. Within this lib directory, we will create a file named intl.ts. In this file, we will define a function called getIntl that will utilize the core functionality of the React Intl library to access localization messages, allowing us to circumvent these limitations.
The intl.ts file:
import { createIntl } from "@formatjs/intl";
import type { Locale } from "../../i18n-config";

export async function getIntl(locale: Locale) {
  return createIntl({
    locale: locale,
    messages: (await import(`../lang/${locale}.json`)).default,
  });
}
To prevent unintended usage of server code in client components, we are going to add a server-only package. This package will trigger a build-time error if any client component accidentally imports a module intended to be run on the server. This safeguard is particularly useful for protecting sensitive data from leaking into client components.
npm install server-only
Once we have installed the server-only package, let's update the intl.ts file with the necessary import statement to protect our server code from accidental leakage into client components.
The intl.ts file:
import "server-only";

import { createIntl } from "@formatjs/intl";
import type { Locale } from "../../i18n-config";

export async function getIntl(locale: Locale) { ... }
Now that we have a way to access localization messages in server components, we can easily use them. We just need to invoke the async function getIntl and pass the locale for which we would like to access the localization messages.
Client components
Just as server components have their benefits, client components do too. They facilitate the development of interactive elements utilizing event handlers, states, effects, and similar functions, as well as the browser API.
In order to use the React Intl library in client components, we first need to set up the IntlProvider. For that purpose, we will add a components directory within the src directory. Inside the components directory, let's create a Footer directory, and add two files within it, namely Footer.tsx and FooterContent.tsx.
Below, you will find a Footer component that gets localization messages and pass them to the the FooterContent component.
The Footer.tsx file:
import FooterContent from "./FooterContent";

async function getMessages(locale: string) {
  return await import(`../../lang/${locale}.json`);
}

type Props = {
  locale: string;
};

export default async function Footer({ locale }: Props) {
  const messages = (await getMessages(locale)).default;

  return (
    <footer className="footer">
      <FooterContent locale={locale} messages={messages} />
    </footer>
  );
}
The FooterContent component, displayed below, is a client component that receives locale and messages props from the Footer component and sets up the IntlProvider. It also accesses localization messages declaratively using the FormattedMessage component.
The FooterContent.tsx file:
"use client";

import { IntlProvider, FormattedMessage } from "react-intl";

type Props = {
  locale: string;
  messages: Record<string, string>;
};

export default function FooterContent({ locale, messages }: Props) {
  return (
    <IntlProvider locale={locale} messages={messages}>
      <div>
        {/* eslint-disable-next-line */}
        <img src="/img/next.svg" width={60} height={12} alt="NextJS" />
      </div>
      <div>
        <FormattedMessage tagName="p" id="common.footer" />
      </div>
    </IntlProvider>
  );
}
Adapt pages for i18n
Now when we have created a way to access localization messages on the server side and on the client side, let's merge these pieces together in our Home page.
First, let's update the RootLayout component to properly set the lang attribute on the html element and to include the Footer component below the content of the Home page.
The layout.tsx file:
import Footer from "../../components/Footer/Footer";
import "./globals.css";

type Props = {
  params: { locale: string };
  children: React.ReactNode;
};

export default function RootLayout({ params, children }: Props) {
  const { locale } = params;

  return (
    <html lang={locale}>
      <body>
        {children}
        <Footer locale={locale} />
      </body>
    </html>
  );
}
Next, let's update Home page content so it also shows two localization messages.
The page.tsx file:
import { getIntl } from "../../lib/intl";
import styles from "./page.module.css";

type HomeProps = {
  params: { locale: string };
};

export default async function Home({ params: { locale } }: HomeProps) {
  const intl = await getIntl(locale);

  return (
    <div className={styles.container}>
      <main className={styles.main}>
        <h1 className={styles.title}>
          {intl.formatMessage(
            { id: "page.home.title" },
            { b: (chunks) => <b key="bold">{chunks}</b> }
          )}
        </h1>

        <p className={styles.description}>
          {intl.formatMessage({ id: "page.home.description" })}
        </p>
      </main>
    </div>
  );
}
Here, we utilize the getIntl method we defined earlier for server components to access localization messages.
Determine text direction
When it comes to text direction, languages can be ltr (Left-to-Right) or rtl (Right-to-Left). The default text direction in HTML is ltr. In most cases, you don't need to configure anything. However, when one of the languages is rtl, you need to set the proper text direction for your pages. In our case, Arabic is an rtl language, so we need to handle that. For that purpose, we extended the intl.ts file with the getDirection function. This function returns the text direction for the passed locale. Later in the code, we will use that function and apply its response to set the appropriate dir attribute for the html element.
The intl.ts file:
import "server-only";

import { createIntl } from "@formatjs/intl";
import type { Locale } from "../../i18n-config";

export async function getIntl(locale: Locale) { ... }

export function getDirection(locale: Locale) {
  switch (locale) {
    case "ar":
      return "rtl";
    case "en":
    case "fr":
    case "nl-NL":
      return "ltr";
  }
}
Note: If you need to manage a large number of languages on your website and are unsure about the text direction for each, consider using packages like rtl-detect for assistance.
Now that we've added a function that returns the appropriate text direction for a locale, let's use it in our app. The easiest way to set the text direction is to set it on the html element, as the directionality set here will propagate to all child elements in the HTML tree that do not have an explicitly set text directionality. For that purpose, let's update our RootLayout component with text directionality.
The layout.tsx file:
import Footer from "../../components/Footer/Footer";
import { getDirection } from "../../lib/intl";
import "./globals.css";

type Props = {
  params: { locale: string };
  children: React.ReactNode;
};

export default function RootLayout({ params, children }: Props) {
  const { locale } = params;

  const dir = getDirection(locale);

  return (
    <html lang={locale} dir={dir}>
      <body>
        {children}
        <Footer locale={locale} />
      </body>
    </html>
  );
}
Add hreflang tags
The hreflang tag is a way to tell search engines which language you are using on a specific page, as well as the other language variants of that page. Doing so will help them present users with the most appropriate version of your page. In this post, we will not delve into the details of hreflang tags, but it should be noted that including them is a good practice for improved SEO. Also, ensure that href attribute values are updated to correspond with your domain. Additionally, for enhanced SEO and better keyword targeting, consider localizing the title and meta description of your page, as illustrated in the example below.
import { Metadata, ResolvingMetadata } from "next";

import { getIntl } from "../../lib/intl";
import styles from "./page.module.css";

type RouteProps = {
  params: { locale: string };
  searchParams: { [key: string]: string | string[] | undefined };
};

export async function generateMetadata(
  props: RouteProps,
  parent: ResolvingMetadata
): Promise<Metadata> {
  const intl = await getIntl(props.params.locale);

  return {
    title: intl.formatMessage({ id: "page.home.head.title" }),
    description: intl.formatMessage({ id: "page.home.head.meta.description" }),
    alternates: {
      canonical: "https://example.com",
      languages: {
        ar: "http://example.com/ar",
        en: "http://example.com",
        fr: "http://example.com/fr",
        "nl-NL": "http://example.com/nl-NL",
        "x-default": "http://example.com",
      },
    },
  };
}

type HomeProps = { ... };

export default async function Home({ params: { locale } }: HomeProps) { ... }
Add language switcher
Incorporating a feature that allows users to change the language on the app is essential if we offer multilingual support. The ability to switch languages enhances the user's experience and satisfaction.
In this blog post, we're going to implement a basic language switcher. To do this, we will create a new Header directory within the components directory. Within the Header directory, we will add a Header.tsx file, which will include the code for our basic language switching functionality.
The Header.tsx file:
import Link from "next/link";
import { i18n } from "../../../i18n-config";

function Header() {
  const { locales, defaultLocale } = i18n;

  return (
    <header>
      <div dir="ltr" className="languages">
        {[...locales].sort().map((locale) => (
          <Link
            key={locale}
            href={locale === defaultLocale ? "/" : `/${locale}`}
          >
            {locale}
          </Link>
        ))}
      </div>
    </header>
  );
}

export default Header;
Having created the language switcher, it's time to embed it into our application by updating the RootLayout to encompass the Header component that features the language switcher.
The layout.tsx file:
import Header from "../../components/Header/Header";
import Footer from "../../components/Footer/Footer";
import { getDirection } from "../../lib/intl";
import "./globals.css";

type Props = { ... };

export default function RootLayout({ params, children }: Props) {
  const { locale } = params;

  const dir = getDirection(locale);

  return (
    <html lang={locale} dir={dir}>
      <body>
        <Header />
        {children}
        <Footer locale={locale} />
      </body>
    </html>
  );
}
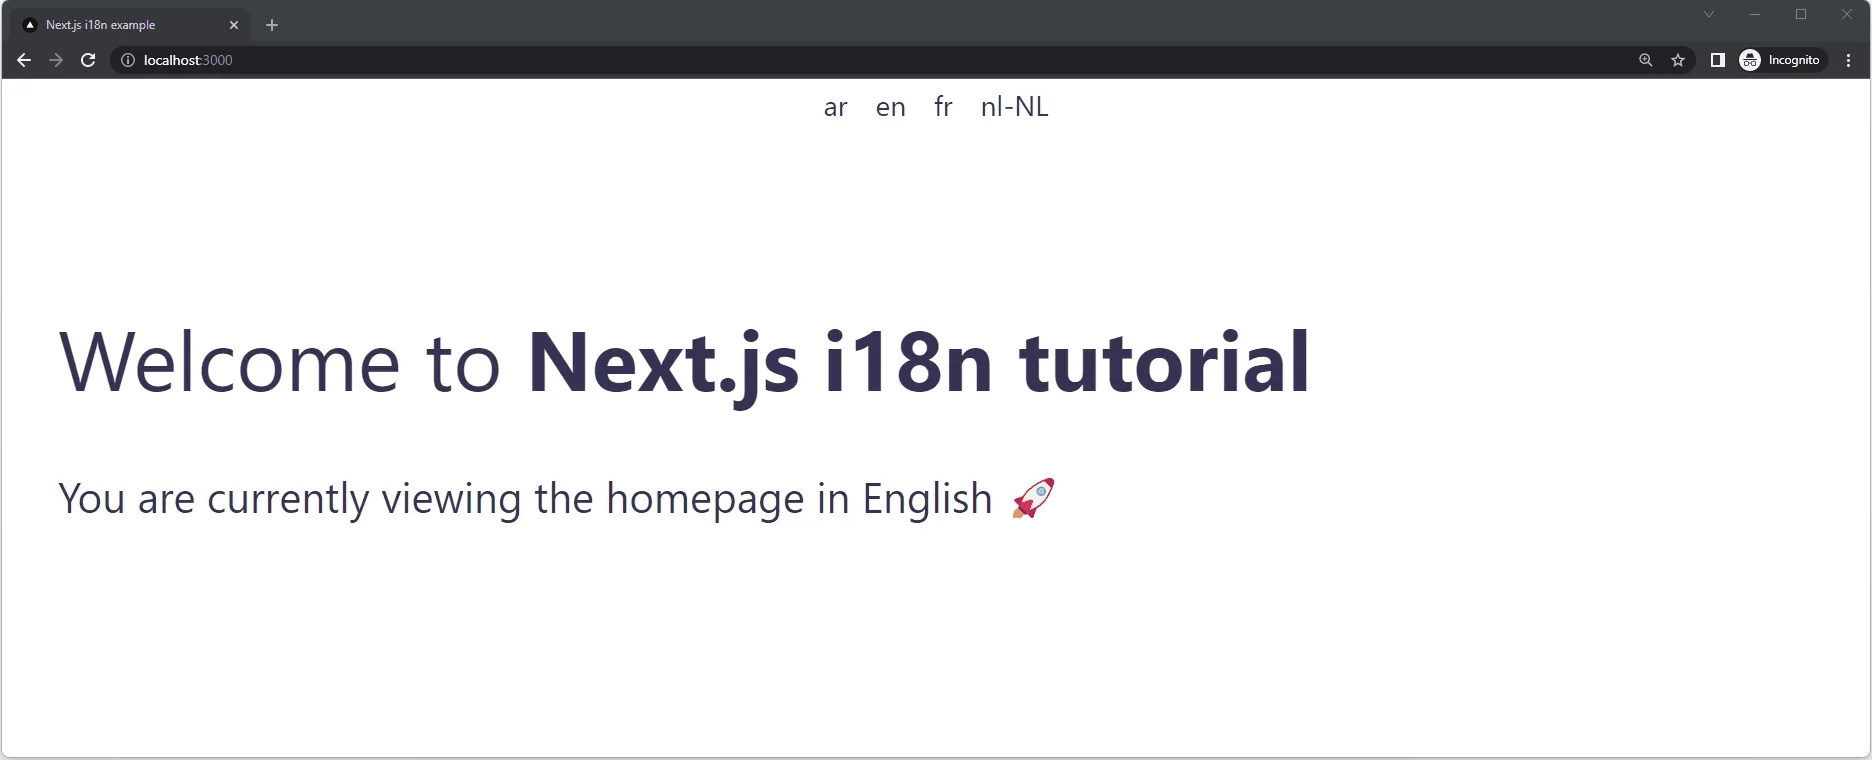
Now, when we've configured most of the things, we could run our Next.js app. Running the following command will allow us to see how our app looks on the localhost.
npm run dev
http://localhost:3000/ ➝ Not found (fixed in upcoming chapter)
http://localhost:3000/ar ➝ Arabic
http://localhost:3000/fr ➝ French
http://localhost:3000/nl-NL ➝ Dutch (Netherlands)
Note: In the interest of simplicity, this post omits styling. For access to the full code, please visit the corresponding GitHub repo.
Automatic locale detection
The automatic locale detection is a handy feature. It enables us to easily identify the user's preferred language from the Accept-Language header. This kind of functionality is not only related to web apps but is also used in other areas like mobile app development where the app preselects the language that best aligns with the user's phone settings.
To easily extract the user's preferred languages from the Accept-Language header, we will use the Negotiator library.
npm i negotiator
npm i @types/negotiator --save-dev
Now that we've added the required dependencies, let's create a middleware.ts file within the src directory. This file will contain middleware that will detect the language from the Accept-Language header and route to the appropriate page variant. Additionally, we will enhance this middleware to identify the default locale, and in the case of a request for the default locale, instruct the middleware to redirect to a path without a locale prefix.
The middleware.ts file:
import { NextResponse } from "next/server";
import type { NextRequest } from "next/server";

import { match } from "@formatjs/intl-localematcher";
import Negotiator from "negotiator";

import { i18n } from "../i18n-config";
import type { I18nConfig } from "../i18n-config";

function getLocale(request: NextRequest, i18nConfig: I18nConfig): string {
  const { locales, defaultLocale } = i18nConfig;

  const negotiatorHeaders: Record<string, string> = {};
  request.headers.forEach((value, key) => (negotiatorHeaders[key] = value));

  const languages = new Negotiator({ headers: negotiatorHeaders }).languages(
    locales
  );

  return match(languages, locales, defaultLocale);
}

export function middleware(request: NextRequest) {
  let response;
  let nextLocale;

  const { locales, defaultLocale } = i18n;

  const pathname = request.nextUrl.pathname;

  const pathLocale = locales.find(
    (locale) => pathname.startsWith(`/${locale}/`) || pathname === `/${locale}`
  );

  if (pathLocale) {
    const isDefaultLocale = pathLocale === defaultLocale;
    if (isDefaultLocale) {
      let pathWithoutLocale = pathname.slice(`/${pathLocale}`.length) || "/";
      if (request.nextUrl.search) pathWithoutLocale += request.nextUrl.search;

      response = NextResponse.redirect(new URL(pathWithoutLocale, request.url));
    }

    nextLocale = pathLocale;
  } else {
    const isFirstVisit = !request.cookies.has("NEXT_LOCALE");

    const locale = isFirstVisit ? getLocale(request, i18n) : defaultLocale;

    let newPath = `${locale}${pathname}`;
    if (request.nextUrl.search) newPath += request.nextUrl.search;

    response =
      locale === defaultLocale
        ? NextResponse.rewrite(new URL(newPath, request.url))
        : NextResponse.redirect(new URL(newPath, request.url));
    nextLocale = locale;
  }

  if (!response) response = NextResponse.next();

  if (nextLocale) response.cookies.set("NEXT_LOCALE", nextLocale);

  return response;
}

export const config = {
  matcher: "/((?!api|_next/static|_next/image|img/|favicon.ico).*)",
};
To check how this works, let's run the Next.js app on the localhost and try to open it with different browser settings.
- Run the app on the localhost
npm run dev
- Update browser language to Arabic, English, French, or Dutch (Netherlands)
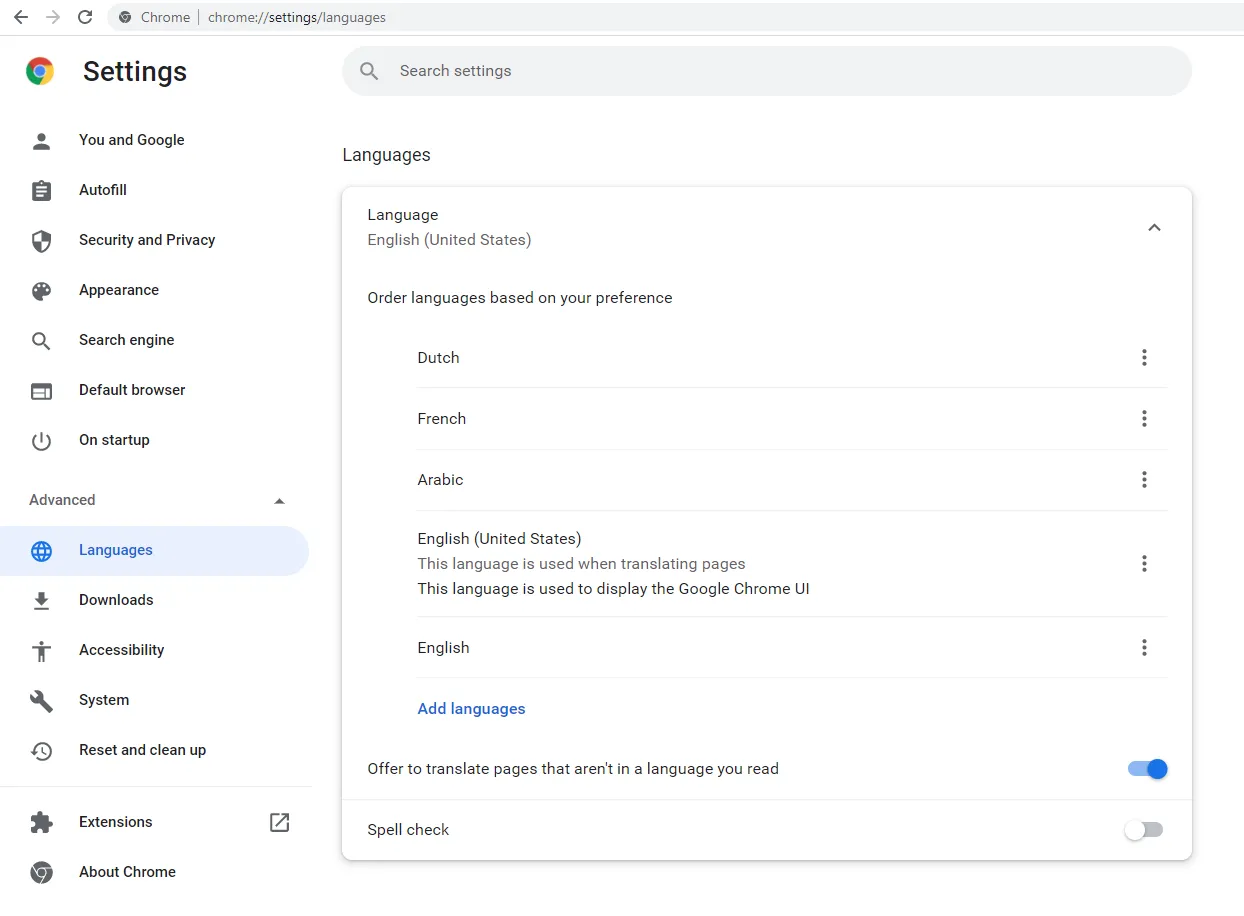
- Open the app in browser
Whenever we change the browser language and open http://localhost:3000, we will be redirected to the appropriate page.
Arabic ➝ http://localhost:3000/ar
French ➝ http://localhost:3000/fr
Dutch (Netherlands) ➝ http://localhost:3000/nl-NL
Other langauges ➝ http://localhost:3000
Note: Automatic locale detection will be performed only when a user visits the app's homepage for the first time. To test this feature for other app languages, clear the NEXT_LOCALE cookie first.
Keep selected language in cookie for future visits
It's important to acknowledge that Next.js simplifies the process of handling cookies within its middleware, providing a straightforward way to save the user's preferred language setting. This ensures that every subsequent request is informed of the user's language preference. While this tutorial has demonstrated how to save the preferred locale via cookies, we haven't explained how to redirect users to their preferred language pages based on cookie values. We'll bypass this aspect for now to maintain a simple tutorial structure.
Nevertheless, when deciding to leverage cookies for managing language settings, consider the following:
- Determine the optimal cookie duration for your scenario, whether it be for a session or a specified period such as a day or a month.
- Assess any complications that may arise with Next.js's caching mechanisms.
- Ensure your application can effectively determine the user's preferred language, particularly when there's a discrepancy between the locale indicated by the cookie and the one suggested by the
Accept-Languageheader.
Static HTML export
Web apps don't always require databases or servers; many websites function optimally with only static files, which are simple to host and often cost little to nothing. In the end, it all depends on the purpose for which the website is used. The Next.js framework supports static exports. Below are two code snippets that would allow us to generate static HTML files in our Next.js project. It's important to recognize, though, that with these snippets, static HTML files are the only result; dynamic features like user redirection or detection of Accept-Language header aren't possible. While there are some solutions and workarounds to these limitations, this guide will not explore them in order to keep things simple and straightforward.
The next.conig.js file:
/** @type {import('next').NextConfig} */
const nextConfig = {
  output: "export",
};

module.exports = nextConfig;
The page.tsx file:
import { Metadata, ResolvingMetadata } from "next";

import { getIntl } from "../../lib/intl";
import { i18n } from "../../../i18n-config";
import styles from "./page.module.css";

type RouteProps = { ... };

export async function generateMetadata( ... ): Promise<Metadata> { ... }

type HomeProps = { ... };

export default async function Home({ params: { locale } }: HomeProps) { ... }

export async function generateStaticParams() {
  const { locales } = i18n;

  return locales.map((locale) => ({
    locale: locale,
  }));
}
All code samples used in this section are available on the GitHub repo.
Create a new Next.js project
What better way to begin than with a fresh new project? To create a new Next.js project, we will use the create-next-app CLI tool. This tool is maintained by the creators of Next.js and will make the creation process easier for us. By running the command below, we will create a new Next.js project called nextjs-i18n-example in a directory with the same name.
npx create-next-app@latest nextjs-i18n-example
Since this command operates in interactive mode, we will go with the following settings for the purposes of this tutorial.
Would you like to use TypeScript? [No]
Would you like to use ESLint? [Yes]
Would you like to use Tailwind CSS? [No]
Would you like to use `src/` directory? [No]
Would you like to use App Router? (recommended) [No]
Would you like to customize the default import alias (@/*)? [No]
Add React Intl dependency
Next.js is compatible with a wide range of i18n libraries, including react-intl, lingui, next-intl, among others. In this post, we've chosen to use React Intl because of its widespread adoption and advanced features, such as ICU syntax support and various formatting options. To incorporate it, let's navigate to the nextjs-i18n-example directory we previously created and install react-intl.
cd nextjs-i18n-example
npm i react-intl
Add config for internationalized routing
Translations and routing are two main pillars of internationalization. The previously added react-intl library is going to handle translations and formatting. When it comes to routing, Next.js has built-in support for that. This built-in support offers two options, sub-path routing, and domain routing. As the names imply, sub-path routing uses the locale in the url path, whereas domain routing uses different domains for serving content for different locales. In our case, we will use sub-path routing as it is less complex and more common for average websites.
Sub-path routing examples
- /blog
- /fr/blog
- /nl-NL/blog
Domain routing examples
- example.com/blog
- example.fr/blog
- example.nl/blog
To use the built-in support for internationalized routing, we need to update the next.config.js file with the i18n config. The locales represents the list of locales we are going to support in our app. The defaultLocale represents the default locale of the app. That means that all pages for Arabic, French, and Dutch (Netherlands) will be prefixed with the ar, fr, and nl-NL in url path.
The next.config.js file:
/** @type {import('next').NextConfig} */
const nextConfig = {
  reactStrictMode: true,
  i18n: {
    // The locales you want to support in your app
    locales: ["ar", "en", "fr", "nl-NL"],
    // The default locale you want to be used when visiting a non-locale prefixed path e.g. `/hello`
    defaultLocale: "en",
  },
};

module.exports = nextConfig;
Note: The internationalized routing is available since Next.js 10.
Automatic Locale Detection
The above-added config for the internationalized routing by default includes automatic locale detection. That means that Next.js will try to automatically detect which locale the user prefers based on the Accept-Language header. To check how this works, let's run the Next.js app on the localhost and try to open it with different browser settings.
- Run the app on the localhost
npm run dev
- Update browser language to Arabic, English, French, or Dutch (Netherlands)
- Open the app in browser
Whenever we change the browser language and open http://localhost:3000, we will be redirected to the appropriate page.
Arabic ➝ http://localhost:3000/ar
French ➝ http://localhost:3000/fr
Dutch (Netherlands) ➝ http://localhost:3000/nl-NL
Other langauges ➝ http://localhost:3000
In some rare cases, you might want to disable automatic locale detection. To achieve that, you should set the localeDetection to false in the next.config.js file. After that, Next.js will no longer automatically redirect based on the user's preferred locale.
The next.config.js file:
...
const nextConfig = {
  ...
  i18n: {
    ...
    localeDetection: false
  },
};
...
Create localization files
The next important thing is to add localization files. For that purpose, let's create a lang directory. Within it, add four JSON files: ar.json, en.json, fr.json, and nl-NL.json. These files are going to hold translations for Arabic, English, French, and Dutch (Netherlands), respectively. Below, you can see the project structure after adding the mentioned files.
nextjs-i18n-example
|-- lang
|   |-- ar.json
|   |-- en.json
|   |-- fr.json
|   |-- nl-NL.json
|-- pages
|   |-- api
|   |-- _app.js
|   |-- index.js
|   |-- ...
|-- public
|-- ...
|-- package.json
|-- package-lock.json
Afterward, fill in localization files with messages that we will use later.
The ar.json file:
{
  "page.home.head.title": "مثال على Next.js i18n",
  "page.home.head.meta.description": "مثال Next.js i18n - عربي",
  "page.home.title": "مرحبًا بك في <b> البرنامج التعليمي Next.js i18n </b>",
  "page.home.description": "أنت الآن تستعرض الصفحة الرئيسية بالعربية 🚀"
}
The en.json file:
{
  "page.home.head.title": "Next.js i18n example",
  "page.home.head.meta.description": "Next.js i18n example - English",
  "page.home.title": "Welcome to <b>Next.js i18n tutorial</b>",
  "page.home.description": "You are currently viewing the homepage in English 🚀"
}
The fr.json file:
{
  "page.home.head.title": "Next.js i18n exemple",
  "page.home.head.meta.description": "Next.js i18n exemple - Français",
  "page.home.title": "Bienvenue à <b>Next.js i18n didacticiel</b>",
  "page.home.description": "Vous consultez actuellement la page d'accueil en Français 🚀"
}
The nl-NL.json file:
{
  "page.home.head.title": "Next.js i18n voorbeeld",
  "page.home.head.meta.description": "Next.js i18n voorbeeld - Nederlands (Nederland)",
  "page.home.title": "Welkom bij <b>Next.js i18n zelfstudie</b>",
  "page.home.description": "U bekijkt momenteel de homepage in het Nederlands (Nederland) 🚀"
}
Configure react-intl in Next.js project
Internationalized routing and localization files are just the first part of the task. The second part is setting up the react-intl library. Below, you can see what changes have been made in the _app.js file.
Wrap the app with the IntlProvider
The react-intl uses the provider pattern for passing the i18n context to a tree of components. Therefore, we will need to wrap the app's root with the IntlProvider. Using the useRouter hook, we can access the locale information and pass appropriate localization messages to the IntlProvider.
Determine text direction
When it comes to the text direction, languages can be ltr (left-to-right) or rtl (right-to-left). The default text direction in HTML is ltr. In most cases, you don't need to configure anything. However, when one of the languages is rtl, you might need to handle text direction explicitly. In our case, Arabic is the rtl, so we need to handle that as well. For that purpose, we added the getDirection function. It returns the text direction for the passed locale. Later in the code, we will use that function and pass its response as dir prop to all pages in our app.
Note that this is not the only way for setting the text direction in Next.js apps. Alternatively, you could handle that in the _document.js file by updating the dir attribute of the html element or in your Layout component. For the sake of simplicity, we put that logic inside the _app.js file. However, you should use the approach that works best for you.
The _app.js file:
import { useRouter } from "next/router";
import { IntlProvider } from "react-intl";

import ar from "../lang/ar.json";
import en from "../lang/en.json";
import fr from "../lang/fr.json";
import nl_NL from "../lang/nl-NL.json";

import "../styles/globals.css";

const messages = {
  ar,
  en,
  fr,
  "nl-NL": nl_NL,
};

function getDirection(locale) {
  if (locale === "ar") {
    return "rtl";
  }

  return "ltr";
}

function MyApp({ Component, pageProps }) {
  const { locale } = useRouter();

  return (
    <IntlProvider locale={locale} messages={messages[locale]}>
      <Component {...pageProps} dir={getDirection(locale)} />
    </IntlProvider>
  );
}

export default MyApp;
Adapt pages for i18n
We did most of the work. The last step is to put all this together. Therefore, we are going to update the index.js file under the pages directory. Below, you can find two approaches for accessing the localization messages, imperative and declarative. We've already covered these two ways of usage, formatting options, and similar in another post. Therefore, we will not spend more words on that. Instead, we are going to focus on the hreflang tag, language switcher, and other important things.
Add hreflang tags
The hreflang tag is a way to tell search engines which language you are using on a specific page. Doing so will help them to show users the most appropriate version of your page. In this post, we will not go into depth regarding hreflang, but it should be noted that it is good practice to include them for better SEO. Also, keep in mind that href attribute values need to be updated to correspond to your domain.
Add language switcher
When it comes to the language switcher, we've used the useRouter hook to retrieve locales information. Later, we've mapped each locale to a Link component. The Link component accepts the optional locale prop for transitioning to a different locale from the currently active one. If not provided, the locale prop will use the currently active locale.
Keep selected language in cookie for future visits
It is worth noting that Next.js allows you also to store selected locale in the NEXT_LOCALE cookie. That cookie can be used later for overriding the Accept-Language header (Automatic Locale Detection) by redirecting the user to the correct location. That is, the user that prefers the locale en in the Accept-Language header, but has a NEXT_LOCALE=fr cookie, will be redirected to a page that corresponds to fr locale. In this tutorial, we did not use this cookie. However, its implementation is not complicated. Whenever the user changes the language, the mentioned cookie should be updated.
Set text direction
As for the text direction, we just need to set the dir prop of the Home component to the container of our content. As we stated earlier, this is just one way to solve it. Feel free to use the method that works best for you.
The index.js file:
import Head from "next/head";
import Link from "next/link";
import { useRouter } from "next/router";
import { FormattedMessage, useIntl } from "react-intl";

import styles from "../styles/Home.module.css";

export default function Home({ dir }) {
  const { locales } = useRouter();

  const intl = useIntl();

  const title = intl.formatMessage({ id: "page.home.head.title" });
  const description = intl.formatMessage({ id: "page.home.head.meta.description" });

  return (
    <div className={styles.container}>
      <Head>
        <title>{title}</title>
        <meta name="description" content={description} />
        <link rel="icon" href="/favicon.ico" />

        {/* Add hreflang links */}
        <link rel="alternate" href="http://example.com" hrefLang="x-default" />
        <link rel="alternate" href="http://example.com" hrefLang="en" />
        <link rel="alternate" href="http://example.com/ar" hrefLang="ar" />
        <link rel="alternate" href="http://example.com/fr" hrefLang="fr" />
        <link rel="alternate" href="http://example.com/nl-NL" hrefLang="nl-NL" />
      </Head>

      <header>
        <div className={styles.languages}>
          {[...locales].sort().map((locale) => (
            <Link key={locale} href="/" locale={locale}>
              {locale}
            </Link>
          ))}
        </div>
      </header>

      <main dir={dir} className={styles.main}>
        <h1 className={styles.title}>
          <FormattedMessage id="page.home.title" values={{ b: (chunks) => <b>{chunks}</b> }} />
        </h1>

        <p className={styles.description}>
          <FormattedMessage id="page.home.description" />
        </p>
      </main>
    </div>
  );
}
Congratulations! 🎉
You have successfully set up internationalization in your Next.js project.
If you have followed all the steps, your app should look like the one shown below.
What about static HTML export?
Currently, the biggest weakness of the internationalization of Next.js apps is the inability to export to static HTML. Running such command results in "Error: i18n support is not compatible with next export". This issue has already been reported and discussed. A potential workaround would be to use a regular Next.js deployment strategy or manual handling of i18n routing.
Managing your Next.js translations
Easy to manage a couple of strings in two languages? Sure. But as you add more features and expand to more markets, your app will grow to thousands of strings in a dozen of languages. Here’s how to streamline your app translation process:
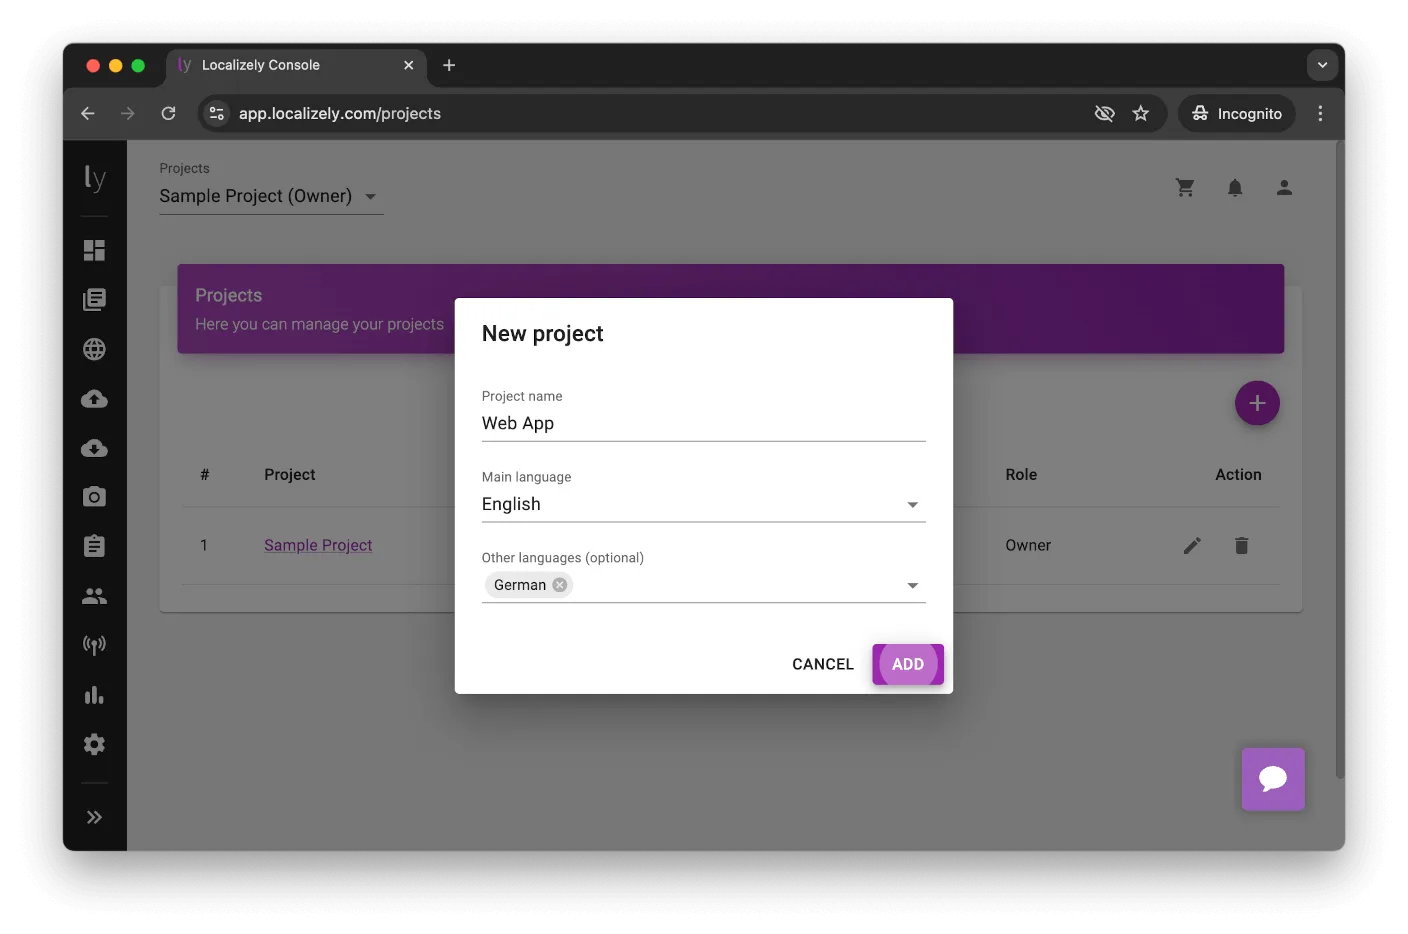
Step 1: Create a project in Localizely
Once you sign up to Localizely, just go to My projects page and tap “+” button (or explore the Sample Project if you wish to get more familiar with Localizely features first). Give your project a name and set your main and other languages. You can change the main language later if needed.
Each project gets a unique ID (you can find it in My projects page), that is needed when using API.
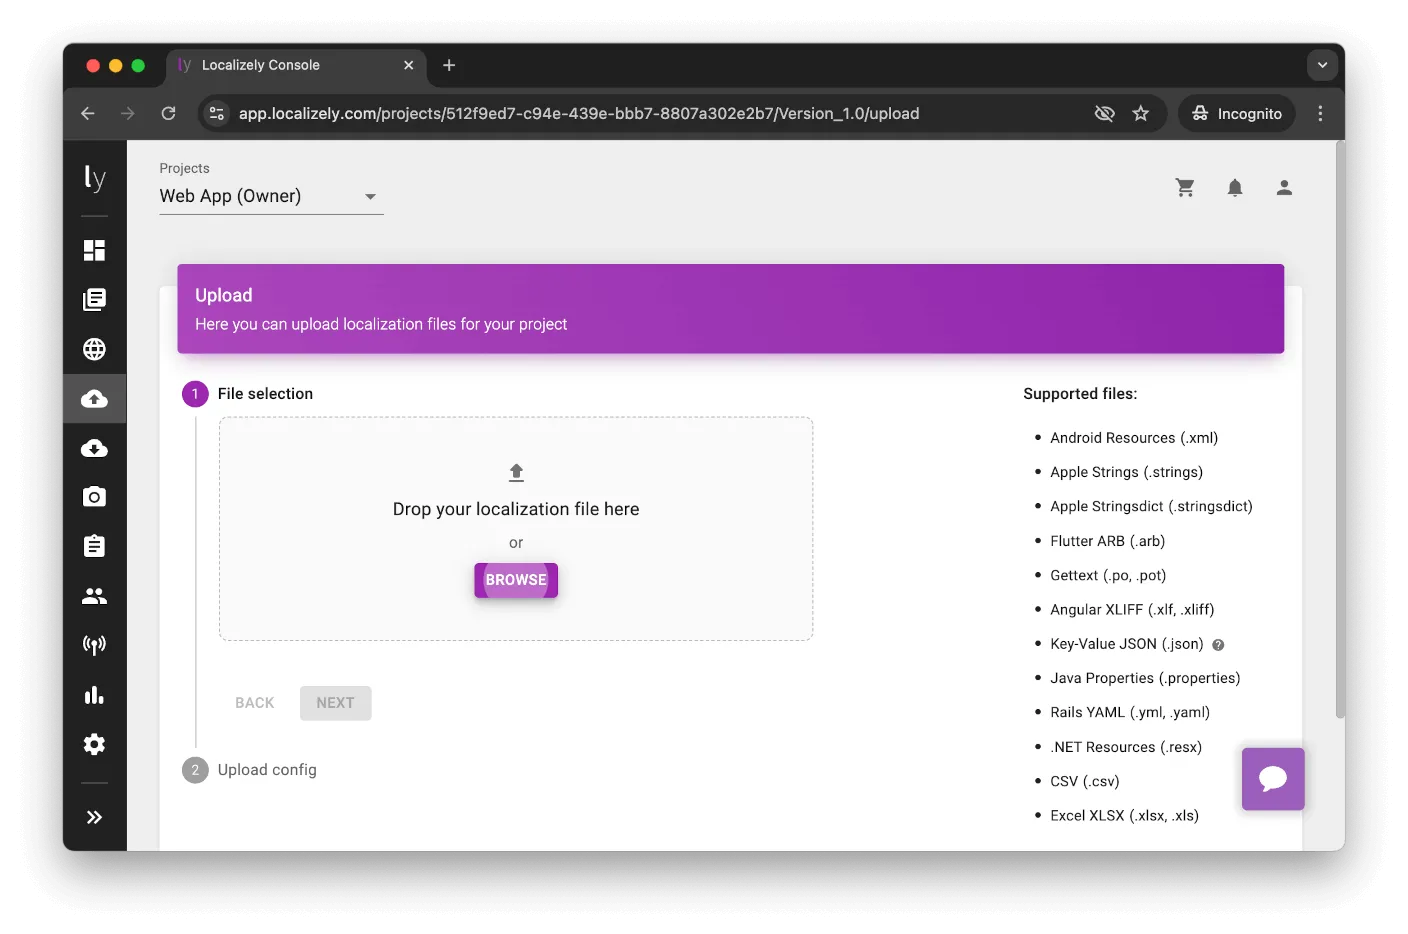
Step 2: Upload your files
Import your main JSON file to Localizely. Go to Upload page, select the file, and confirm. Alternatively, you can start by adding string keys in Localizely first.
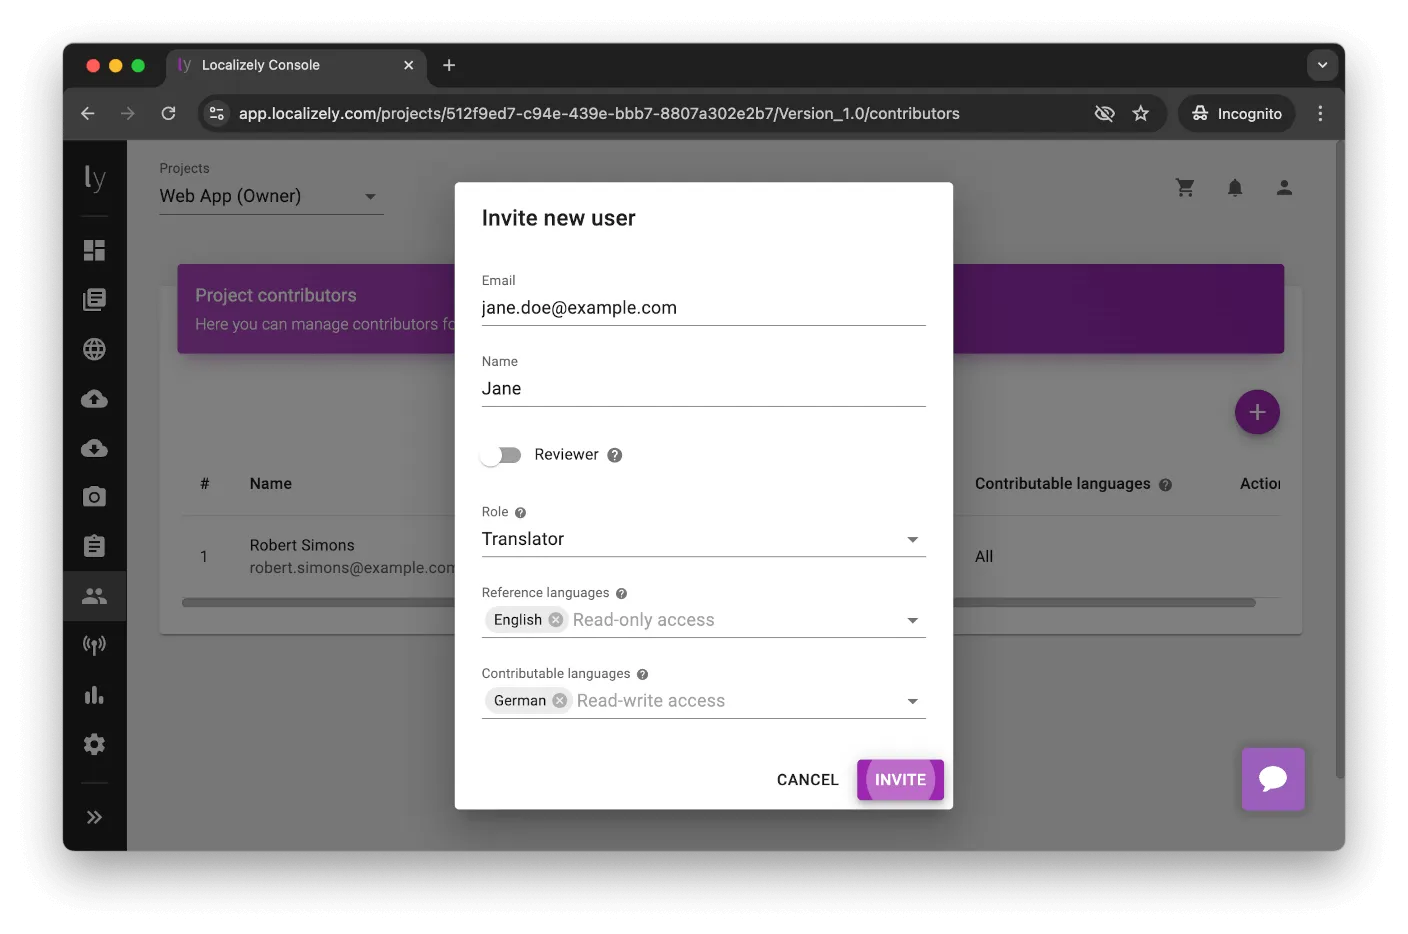
Step 3: Invite team members
Localization work is a team effort. Switch to the Contributors section by clicking the icon in the side menu and start adding teammates. Any user can be granted admin privileges, i.e. the same rights on the project as you. For non-admin contributors, you can specify per-language access to the project specifying some languages as reference (read-only) or contributable (read and update). Only admins have access to string key changes, importing, exporting, settings, etc.
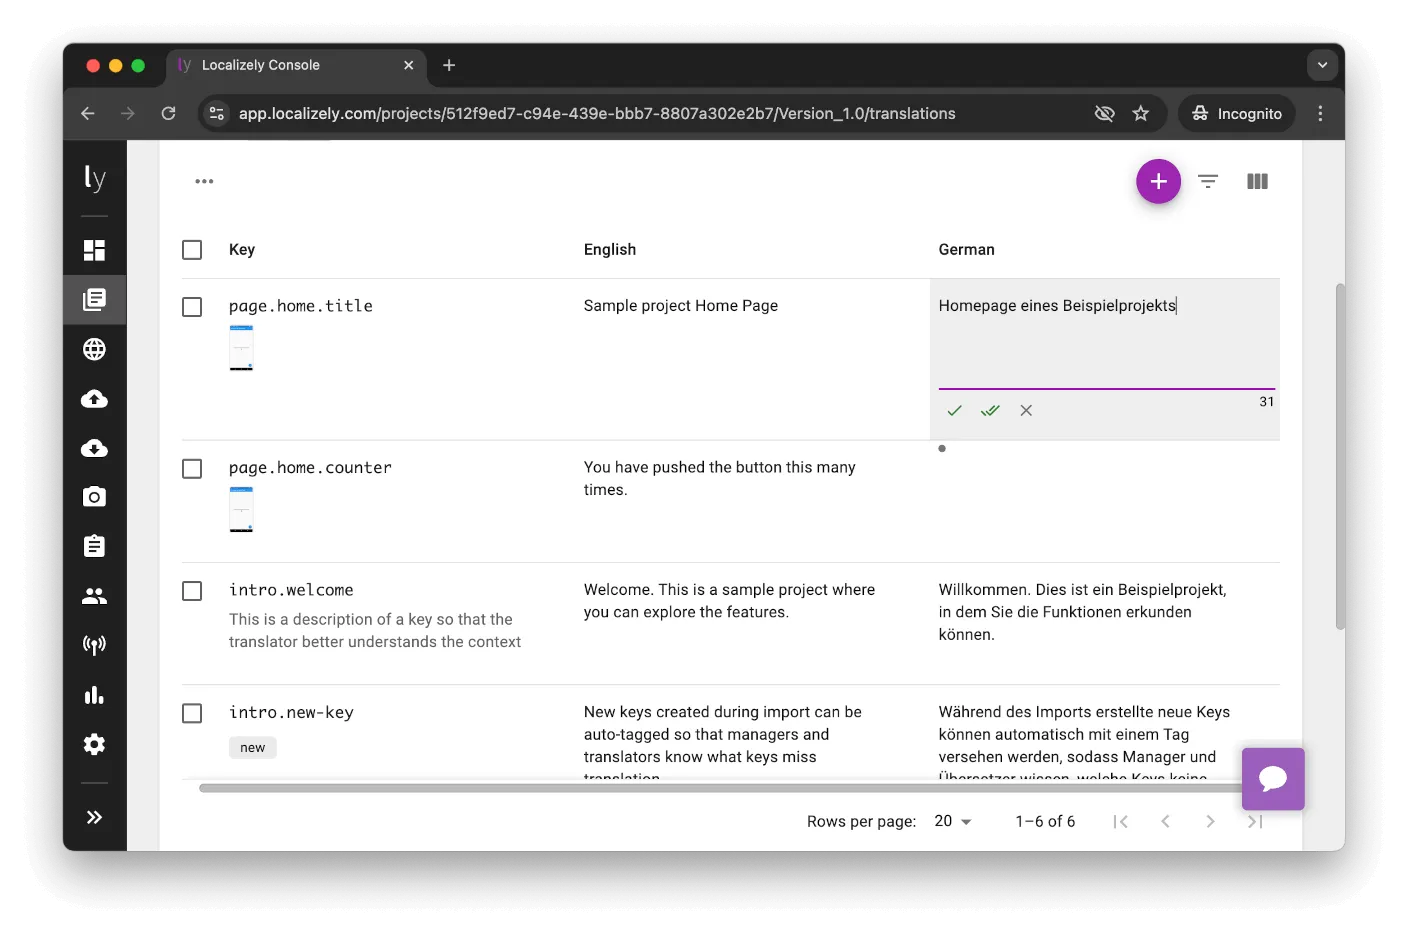
Step 4: Translate
Localizely has an editor on Translations page that reminds of Excel tables commonly used for translations management. Feel free to explore the Sample project or just take a look at Getting started guide to grasp the basic concept and options.
Step 5: Download the files
The translation part is done. How to get the localization data out of Localizely and make it usable in your Next.js app?
There are 2 options:
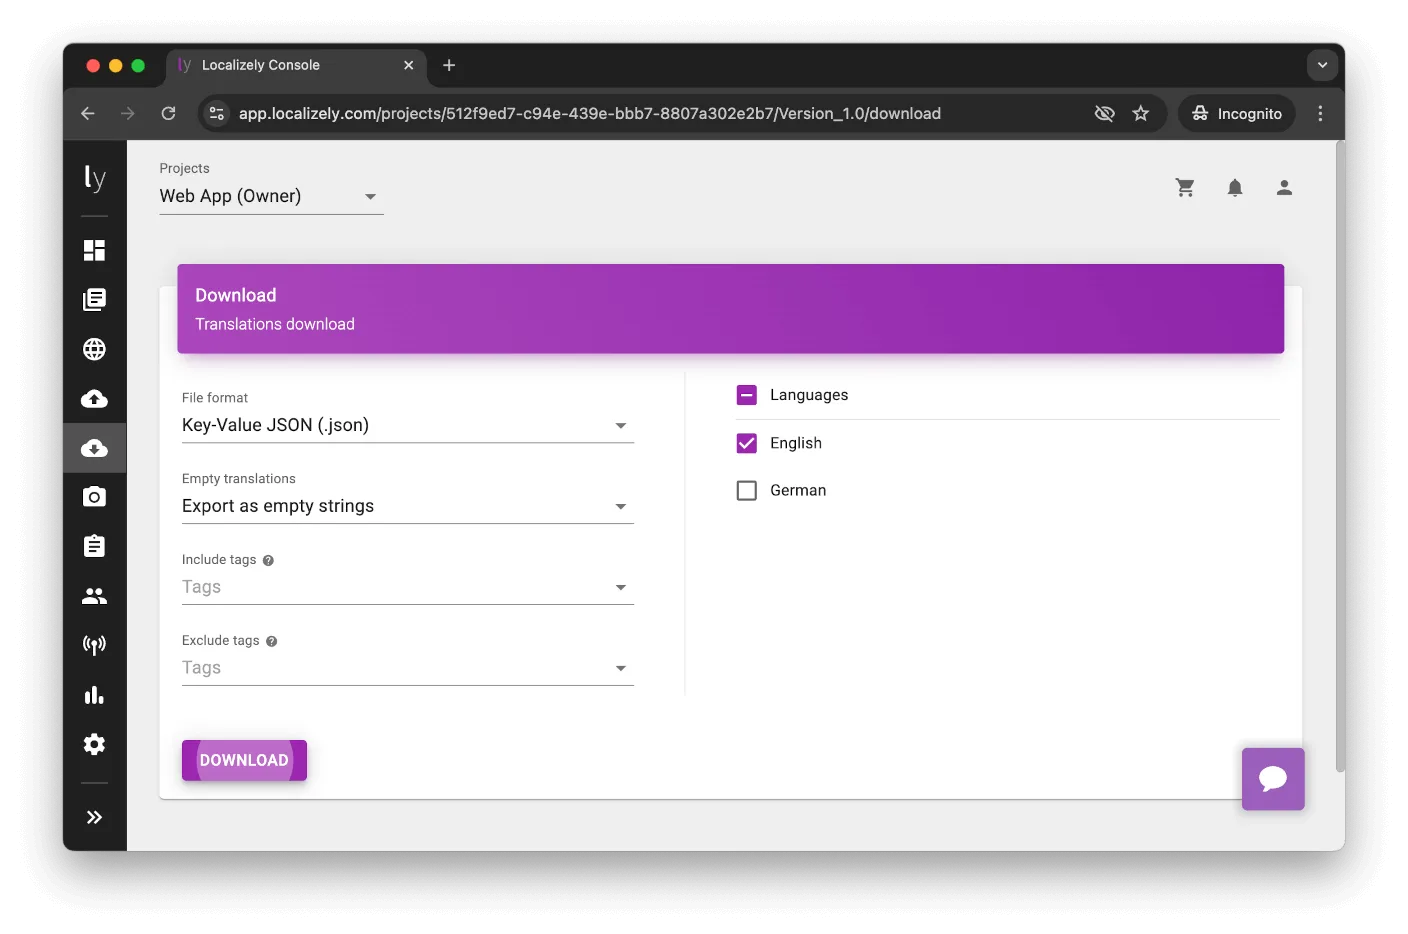
- Option 1: Download manually
Click Download icon in your project side menu and select Key-Value JSON (.json) as the exporting format. Click Download to get the file. Then move downloaded .json file into your project replacing the existing localization, that’s all.
- Option 2: Download via API
Depending on your project deployment setup, you may want to use Localizely API – it gives you a simple way to automatically generate and download localization files.
Conclusion
In this post, we've demonstrated how to integrate the React Intl library with Next.js, utilizing both the App Router and Pages Router. Also, we showed how to automatically detect the user's preferred language, how to add hreflang tags for better SEO, how to determine text direction, and other similar things.
But what about translation? It is a more complex challenge, encompassing the entire lifecycle of the application. Imagine the difficulty of sharing localization files with non-technical team members via email, discussing translations, making changes, and then synchronizing everything. Fortunately, the Localizely platform offers a solution. It streamlines collaboration by facilitating translation tasks, providing a glossary, tracking the history of changes, and much more.
Like this article? Share it!
Zoran is a Software Engineer at Localizely. His primary interest is web development, but he also has a solid background in other technologies. For the last few years, he has been involved in the development of software localization tools.
Enjoying the read?
Subscribe to the Localizely blog newsletter for quality product content in your inbox.

Resources
- What is Localizely?
- Getting started
- Localization workflow
- Translation editor
- Flutter Over-the-Air updates
- Flutter In-Context Editing
- Project branching
- Professional translation services
- Machine Translation
- AI Translation
- Translation Memory
- Glossary
- Tasks
- Reports and statistics
- Figma integration
- AWS S3 integration
- GitHub integration
- GitLab integration
- Bitbucket integration
- CLI
- Configuration file
- Supported file formats
- Language & Country Codes
- Referral Program
- Affiliate Program
- I18N Questions
- FAQ
Free tools
- ICU message for translators
- ICU message editor
- Hreflang generator
- Hreflang checker
- JSON Flattener
- JSON Validator
- YAML Validator
- XML Validator
- CSV Validator
- Text Compare
- Text Encoding Converter
- Localization File Converter
- JSON Word Counter
- ARB Word Counter
- Translation Cost Calculator