Contents
Flutter localization: step-by-step

The idea of maintaining a single codebase for both Android and iOS applications is quite appealing. In the past, our efforts to realize this concept met with limited success. Nonetheless, Flutter is confronting this challenge with an innovative approach. Moreover, its adaptability extends beyond just mobile platforms, enabling the development of applications for the web, desktop, and even embedded systems, all from a single codebase.
The benefits of crafting multiple applications from a single codebase cannot be overstated. However, the question arises: How does this benefit translate when addressing global markets that demand support for multiple languages? Initially, localization tools around Flutter were fairly rudimentary, but they have evolved significantly since then. Today, there is a plethora of robust localization solutions available. In the upcoming chapters, we'll delve into some of the most popular and effective tools for Flutter localization in depth.
Part 1: Setting up your Flutter app
Flutter has recently introduced a new localization approach with the gen_l10n tool. This tool seamlessly integrates into the development workflow, automatically generating all necessary localization files. This integration enables developers to concentrate solely on crafting localization messages and implementing them in the app, while the gen_l10n tool takes care of the otherwise tedious task of producing the required localization code. This automation not only speeds up development but also significantly enhances the developer experience. In the upcoming chapters, we will guide you on how to effectively leverage this powerful localization tool.
All code samples used in this section are available on the GitHub repo.
Step 1: Add dependencies
The first step towards supporting multiple languages in a Flutter application is to add the necessary dependencies into your Flutter project. Please run the commands provided below in your terminal to incorporate them:
flutter pub add flutter_localizations --sdk=flutter
flutter pub add intl:any
After adding them, ensure the pubspec.yaml file is updated to reflect these changes.
Your dependencies section should look something like this:
dependencies:
  # Other dependencies...
  flutter_localizations:
    sdk: flutter
  intl: any
Step 2: Enable generation of localization files
To enable automatic generation of localization files, please update the pubspec.yaml file by adding the following line to the flutter section.
flutter:
  generate: true
  # Other config...
Step 3: Configure localization tool
Create a new l10n.yaml file in the root of the Flutter project. This file will hold the configuration for the gen_l10n tool. You can find the full list of configuration options in this document. However, in this guide, we will use just a few of them:
-
arb-dir– the path of the directory that contains the translation files. -
template-arb-file– the name of the template arb file that will be used as basis for generating the Dart localization files. -
output-localization-file– the name of the file for the output localization and localizations delegate classes.
Below, you can find the content of the l10n.yaml file used in this guide.
arb-dir: lib/l10n
template-arb-file: intl_en.arb
output-localization-file: app_localizations.dart
Step 4: Add translation files
Next, let's add the l10n directory with three ARB files: intl_ar.arb, intl_en.arb, and intl_es.arb. These files are going to hold translations for Arabic, English, and Spanish, respectively. Below, you can see the project structure after adding these files and their content.
FLUTTER_PROJECT
|-- ...
|-- android
|-- ios
|-- lib
|   |-- l10n
|       |-- intl_ar.arb
|       |-- intl_en.arb
|       |-- intl_es.arb
|   |-- main.dart
|-- pubspec.yaml
|-- ...
The intl_ar.arb file:
{
  "helloWorld": "مرحبا بالعالم!"
}
The intl_en.arb file:
{
  "helloWorld": "Hello World!"
}
This intl_es.arb file:
{
  "helloWorld": "¡Hola Mundo!"
}
More info about ARB localization files can be found in a dedicated guide.
Note: If you're using VS Code, consider adding the ARB Editor extension. It enhances your ARB file editing experience with syntax highlighting, snippets, diagnostics, and quick fixes.
Note: The Flutter ARB file allows ICU syntax in messages. However, the gen_l10n tool is still in the active-development phase and does not yet fully support the entire ICU syntax. Reported issues include: multiple/nested plurals and selects in messages; the generator ignores plural forms: zero, one, and two.
Localization in the iOS apps
According to the official documentation, for iOS apps, it is necessary to update the Info.plist file with the list of supported locales. However, there are some indications that automation of this process may be possible in the future. Until then, manually add the following snippet to support localization in iOS apps.
The ios/Runner/Info.plist file:
<key>CFBundleLocalizations</key>
<array>
  <string>ar</string>
  <string>en</string>
  <string>es</string>
</array>
Step 5: Run the app to trigger code generation
To trigger the generation of the localization files, you need to run your application. After that, you will be able to see the generated code in the .dart_tool folder.
FLUTTER_PROJECT
|-- .dart_tool
|   |-- ...
|   |-- flutter_gen
|       |-- gen_l10n
|           |-- app_localizations.dart
|           |-- app_localizations_ar.dart
|           |-- app_localizations_en.dart
|           |-- app_localizations_es.dart
|       |-- ...
|-- android
|-- ios
|-- lib
|-- ...
Note: Each time you run flutter pub get or flutter run command, you will trigger code generation. For generating the same files independently of the application, you can use the flutter gen-l10n command as an alternative.
By default, the gen_l10n tool generates localization files as a synthetic package. Therefore, these files are not checked into the version control system (i.e., Git). However, if for some reason you want to track this code with the version control system, you will need to update your l10n.yaml file with synthetic-package and output-dir config parameters.
The l10n.yaml file:
# Other config...
synthetic-package: false
output-dir: lib/l10n
Step 6: Update the app
The next step involves updating the MaterialApp widget with the localizationsDelegates and supportedLocales properties. So, let's import the generated app_localizations.dart file and set the needed values.
The main.dart file:
import 'package:flutter/material.dart';
import 'package:flutter_gen/gen_l10n/app_localizations.dart';

void main() {
  runApp(const MyApp());
}

class MyApp extends StatelessWidget {
  const MyApp({Key? key}) : super(key: key);

  @override
  Widget build(BuildContext context) {
    return MaterialApp(
      // ...
      localizationsDelegates: AppLocalizations.localizationsDelegates,
      supportedLocales: AppLocalizations.supportedLocales,
      // ...
    );
  }
}
The AppLocalizations.localizationsDelegates represents the list of:
- generated localizations delegate – provides localized messages from ARB files.
GlobalMaterialLocalizations.delegate– provides localized messages for the Material widgets.GlobalCupertinoLocalizations.delegate– provides localized messages for Cupertino widgets.GlobalWidgetsLocalizations.delegate– provides text direction for widgets.
These delegates allow us to use different languages throughout the app without much hassle. They also translate the interface of both Material and Cupertino widgets into around 115 languages (for instance, the Material date picker) and configure text directions within the app.
The AppLocalizations.supportedLocales represents the list of supported locales.
Finally, paste the snippet shown below somewhere in the code and hot-reload the app to see how everything works.
Text(AppLocalizations.of(context)!.helloWorld)
If you have followed all the steps from the beginning, you should be able to see the translated message. Note that whenever you change the language of the device to Arabic, English, or Spanish, the message will be updated.
Text direction: Left-to-Right and Right-to-Left
Although most languages are written Left-to-Right (LTR), it is important to be aware that there are also Right-to-Left (RTL) languages. In this guide, we have included Arabic, which is an RTL language. Whenever the app is opened in Arabic, the layout should change accordingly. Generally, the Flutter framework updates the text direction within the app to correspond to the selected locale. In most cases, no adjustments are necessary. However, if the layout is designed exclusively for LTR languages or uses some hard-coded values, there is a possibility it may not display correctly. Be aware that adding an RTL language like Arabic to your app might also necessitate changes to your layout.
Escaping syntax
Typically, the content of localization messages is straightforward. Nevertheless, on occasion, there is a need to incorporate messages with special characters, such as curly braces { and }. To prevent these tokens from being parsed, it is necessary to enable the use-escaping flag within the l10n.yaml file.
The l10n.yaml file:
use-escaping: true
Once escaping is enabled, utilize single quotes to escape special characters in your localization messages.
{
  "escapingExample": "In math, '{1, 2, 3}' denotes a set."
}
Avoid null checking
By default, getters in the generated localizations class are nullable. To eliminate the need for repeated null checks, you can turn off the nullable-getter option in the l10n.yaml file.
The l10n.yaml file:
nullable-getter: false
After disabling nullable getters, you will be able to access the localization messages as shown below.
AppLocalizations.of(context).yourMessage
Get the selected locale
To get the selected locale of the widget tree, use the snippet shown below.
Locale selectedLocale = Localizations.localeOf(context);
Override the locale
In some rare cases, you might want to override the locale of one part of the widget tree. For that purpose, you should use the Localizations.override factory constructor. Below, you can see an example where the helloWorld message is shown regularly and with an overridden locale.
@override
Widget build(BuildContext context) {
  return Column(
    children: [
      Text(AppLocalizations.of(context)!.helloWorld),
      Localizations.override(
        context: context,
        locale: const Locale('es'),
        // Using a Builder here to get the correct BuildContext.
        child: Builder(
          builder: (BuildContext context) {
            return Text(AppLocalizations.of(context)!.helloWorld);
          },
        ),
      ),
    ],
  );
}
Custom locale resolution logic
It's worth noting that Flutter supports custom locale resolution logic. If you need such thing for any reason, you simply need to provide a localeResolutionCallback to the MaterialApp. This callback will be called each time the Flutter app starts or when the user changes the language of the device.
MaterialApp(
  // ...
  localeResolutionCallback: (locale, supportedLocales) {
    // Add your custom resolution logic
    return locale;
  },
);
Change app language programmatically
We've observed how Flutter can identify the device's language settings, which is the user's preferred language, and tailor the app accordingly. We've also explored methods for overriding the language in specific areas of the app. What about incorporating a manual language switcher within the app, though? Fortunately, this isn't a complex task. It simply requires setting the selected language as a locale property to the MaterialApp widget. For more details, please refer to the provided example.
Part 2: Managing your Flutter localizations
Managing a couple of strings in two languages? Sure, that's easy. But as you add more features and expand into more markets, your app will grow to include thousands of strings across dozens of languages. Here's how to automate your Flutter localization:
Step 1: Create a project in Localizely
Once you sign up to Localizely, just go to the My projects page and tap the “+” button (or explore the Sample Project if you wish to get more familiar with Localizely features first). Give your project a name and set your main and other languages; you can change the main language later if needed.

Each project receives a unique ID, which can be found on the My projects page and is required when using the API.
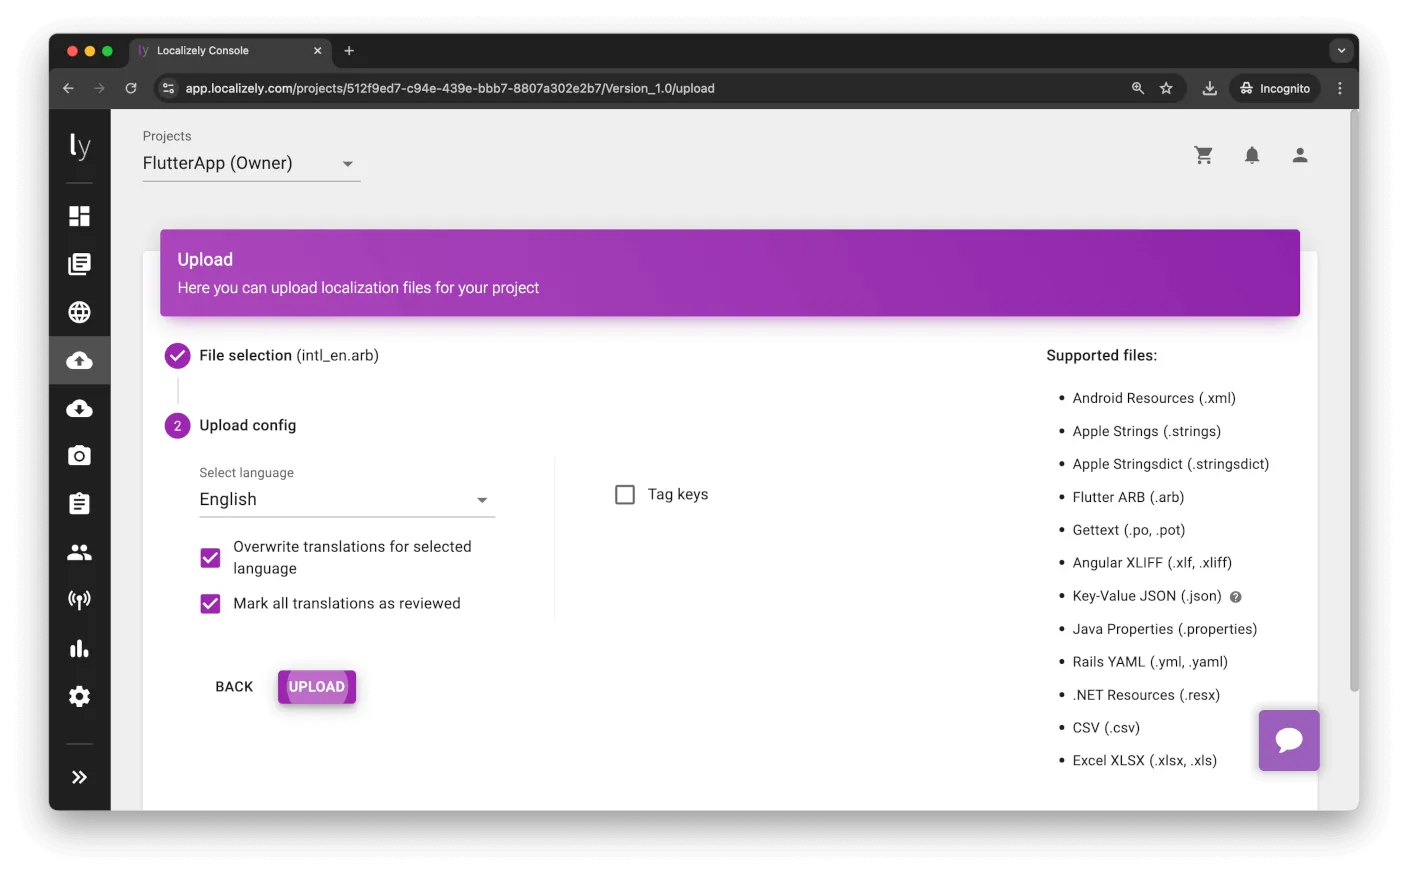
Step 2: Upload your files
Import your main ARB file into Localizely by navigating to the Upload page. Select the file and click confirm. Alternatively, you can begin by adding string keys directly in Localizely.
Step 3: Invite team members
Localization work is a team effort. Click the icon in the side menu to switch to the Contributors section and add teammates. Any user can be granted admin privileges, i.e., the same rights on the project as you have. For non-admin contributors, you can specify access on a per-language basis. Assign some languages as reference (read-only) and others as contributable (read and update). Only admins have access to string key changes, importing, exporting, settings, and so on.

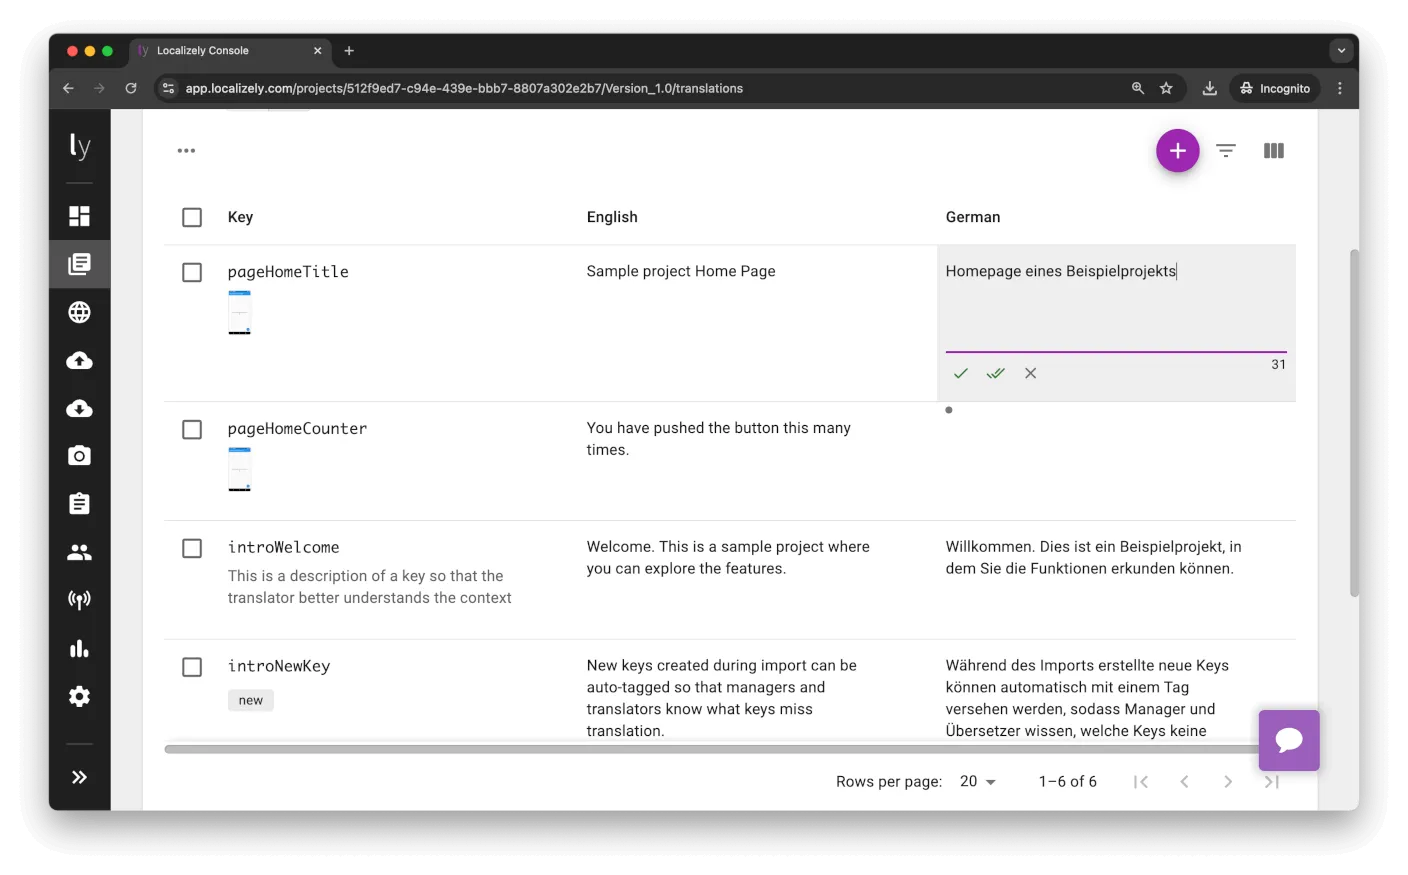
Step 4: Translate
Localizely has an editor on the Translations page that resembles Excel tables commonly used for translation management. Feel free to explore the Sample project or take a look at the Getting started guide to grasp the basic concepts and options.
Step 5: Download the files
The translation part is done. How to get the localization data out of Localizely and make it usable in your Flutter app?
There are 2 options:
-
Option 1: Download manually
Click the Download icon in your project's side menu and select Flutter ARB as the exporting format. Click the Download button to obtain the file. Then move the downloaded .arb file into your project, replacing the existing localization; that’s all.

-
Option 2: Download via API
Depending on your project deployment setup, you may want to use the Localizely API. It gives you a simple way to automatically generate and download localization files.
Part 1: Setting up your Flutter app
To support multiple languages in your Flutter application, you first need to set it up. In this section, you will learn how to accomplish this by using the Flutter Intl plugin. This plugin automatically generates localization code, simplifies the addition of new languages, extracts text for translation, and performs other related tasks.
All code samples used in this section are available on the GitHub repo.
Step 1: Install IDE plugin
Install the Flutter Intl plugin for the IDE you are using (Visual Studio Code or Android Studio).
In this guide, we will explain how to do it in Android Studio. It should be fairly similar in Visual Studio Code, just follow the steps in the extension documentation.
Flutter Intl IDE plugin exceeded 200K installations on VS Code and Android Studio! 🎉
— Localizely (@localizely) April 13, 2021
Thanks for your feedback! #flutter #flutterdev
There is also a CLI tool named intl_utils in case you need similar operations for continuous integration purposes.
Step 2: Initialize plugin for your project
Go to Tools | Flutter Intl and run Initialize for the Project.
By default en locale is added by auto-creating a file lib/l10n/intl_en.arb.
Note: The plugin generates and maintains files within the lib/generated/ folder, which should not be edited manually. However, these files should be tracked in your project repository.
Step 3: Set up your app
Add dependency needed for localization to pubspec.yaml file:
dependencies:
  # Other dependencies...
  flutter_localizations:
    sdk: flutter
  intl: any
Next, run the following command from Terminal to download them:
flutter pub get
Set up your localizationsDelegates and your supportedLocales, which will allow access to the strings, localize Material's and Cupertino's widgets to support around 115 languages (e.g., Material's date picker), and set up text directionality within the app.
import 'package:flutter_localizations/flutter_localizations.dart';
import 'generated/l10n.dart';

class MyApp extends StatelessWidget {
    @override
    Widget build(BuildContext context) {
        return new MaterialApp(
            localizationsDelegates: [
                S.delegate,
                GlobalMaterialLocalizations.delegate,
                GlobalWidgetsLocalizations.delegate,
                GlobalCupertinoLocalizations.delegate,
            ],
            supportedLocales: S.delegate.supportedLocales,
            title: 'Flutter Demo',
            home: new MyHomePage(title: 'Flutter Demo Home Page'),
        );
    }
}
Step 4: Add other locales
You probably want to localize your Flutter app into more than one locale.
You can add more locales by going to Tools | Flutter Intl and running Add locale command.
Step 5: Add string keys to main ARB file
Your main ARB file, by default, is lib/l10n/intl_en.arb. When you add new key-value pairs to it and save the file, those keys will become automatically available for auto-completion in your Dart code.
File content example:
{
  "title": "Hello world!"
}
In essence, an ARB file is a JSON file with some conventions.
Step 6: Reference the keys in Dart code
The ARB file’s keys now correspond to methods from the S class. For example:
Widget build(BuildContext context) {
  return Text(
      S.of(context).title
  );
}
As an alternative method, you can add a localizable text directly in the Dart code and then extract it to ARB files using intention actions in Android Studio or code actions in VS Code. This process will allow you to add the corresponding string key to all ARB files.
Part 2: Managing your translations
As your app grows with the number of string keys and the number of different languages for end-users, it gets more complicated to maintain translations.
Here is how to streamline the localization workflow:
Step 1: Create a project in Localizely
Once you sign up to Localizely, just go to My projects page and tap “+” button (or explore the Sample Project if you wish to get more familiar with Localizely features first). Give your project a name, and set your main and other languages. You can change the main language later if needed.
Each project gets a unique ID (you can find it in My projects page), that is needed for the next step.
Step 2: Connect your IDE with Localizely
In your IDE go to Tools | Flutter Intl | Integrate with Localizely and run Connect command.
You will be asked for your personal API token which you can get from My Profile page, and project ID we mentioned in the previous step.
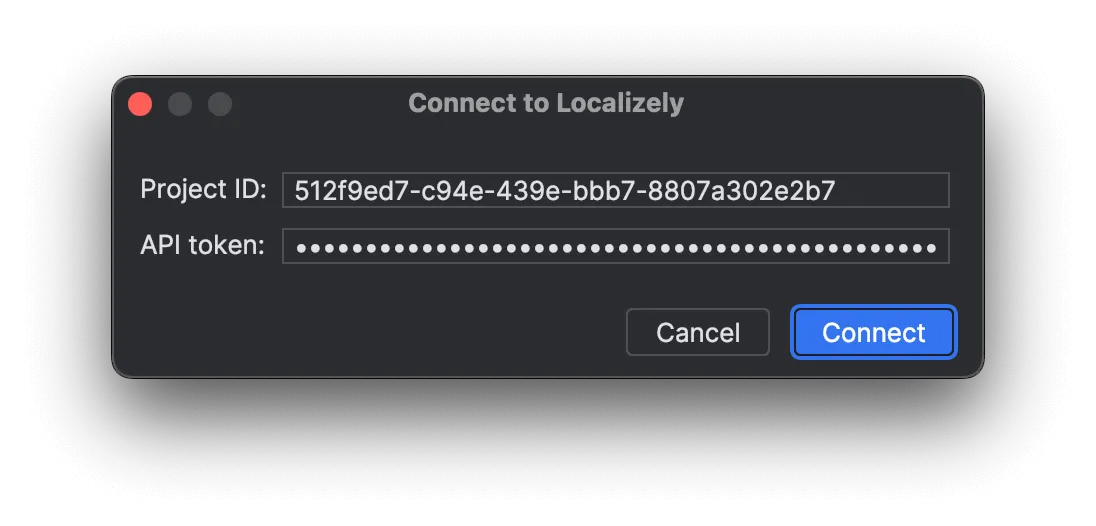
Enter the data and click connect.
Once connected, your personal API token will be stored inside the file <USER_HOME>/.localizely/credentials, and project ID will be added to pubspec.yaml file inside your project.
Check out plugin documentation for additional but optional config parameters inside pubspec.yaml file.
Step 3: Upload main ARB file
During the development of the app, we constantly add new string keys that need to be translated later. A common practice is to add those new string keys only to the main locale during development.
Once planned features are implemented, you want to upload the main ARB file to Localizely, for your team to translate it.
In your IDE go to Tools | Flutter Intl | Integrate with Localizely and run Upload main ARB file command.
Note: Alternatively you can always add new string keys in Localizely platform first, and then download them for development. It depends on what fits into your workflow better.
Step 4: Translate
Localizely has an editor on Translations page that reminds of Excel tables commonly used for translations management. Feel free to explore the Sample project or just take a look at Getting started guide to grasp the basic concept and options.
If you have previously invited your teammates to the Localizely project, you can assign them a task to translate newly added string keys.
Step 5: Download translated ARB files
The translation part is done.
In your IDE go to Tools | Flutter Intl | Integrate with Localizely and run Download ARB files command.
ARB files will be downloaded from Localizely platform and put in the proper place in your Flutter project.
Step 6: Publish your app
Your Flutter app now has ready translations for the next release.
You are ready to do QA check and publish the app!
In case you are interested in instant updates of translations without the need for new releases, check out the Flutter Over-the-Air translation updates feature. It will let you correct typos, optimize text, and update translations on the fly.
Part 1: Setting up your Flutter app
Flutter has good documentation on how to get started with a sample app, so we will not go into that here. We will describe how to introduce localization to your sample app. You can use Android Studio or Visual Studio Code as IDE, it is the same.
Step 1: Add dependencies
Start by defining these localization dependencies in your pubspec.yaml:
dependencies:
  flutter:
    sdk: flutter
  flutter_localizations: # added
    sdk: flutter # added

dev_dependencies:
  flutter_test:
    sdk: flutter
  intl_translation: # added
Install packages by running following command from Terminal:
flutter pub get
Step 2: Create localization classes
We can do this by creating AppLocalizations and AppLocalizationsDelegate classes in a separate lib/localizations.dart file.
import 'package:flutter/material.dart';
import 'package:intl/intl.dart';
import 'l10n/messages_all.dart';

class AppLocalizations {
  AppLocalizations();

  static const AppLocalizationsDelegate delegate = AppLocalizationsDelegate();

  static Future<AppLocalizations> load(Locale locale) {
    final String name = locale.countryCode.isEmpty ? locale.languageCode : locale.toString();
    final String localeName = Intl.canonicalizedLocale(name);

    return initializeMessages(localeName).then((_) {
      Intl.defaultLocale = localeName;
      return AppLocalizations();
    });
  }

  static AppLocalizations of(BuildContext context) {
    return Localizations.of<AppLocalizations>(context, AppLocalizations);
  }


  // Your keys defined below
  String get title {
    return Intl.message(
      'Hello World',
      name: 'title',
      desc: 'Title for the Localized application',
    );
  }

  String welcome(String name) {
    return Intl.message(
      'Welcome {name}',
      name: 'welcome',
      desc: 'Welcome message',
      args: [name],
    );
  }
}

class AppLocalizationsDelegate extends LocalizationsDelegate<AppLocalizations> {
  const AppLocalizationsDelegate();

  // Override with your list of supported language codes
  List<Locale> get supportedLocales {
    return const <Locale>[
      Locale('en', ''),
      Locale('de', ''),
    ];
  }

  @override
  bool isSupported(Locale locale) => _isSupported(locale);

  @override
  Future<AppLocalizations> load(Locale locale) => AppLocalizations.load(locale);

  @override
  bool shouldReload(AppLocalizationsDelegate old) => false;

  bool _isSupported(Locale locale) {
    if (locale != null) {
      for (Locale supportedLocale in supportedLocales) {
        if (supportedLocale.languageCode == locale.languageCode) {
          return true;
        }
      }
    }
    return false;
  }
}
At the end of AppLocalizations class we define all string keys we will use inside our app.AppLocalizationsDelegate class has a list of supportedLocales. We should put all locales we support for end-users into that list.
Step 3: Update app widgets
Now, that we have defined 2 string keys in AppLocalizations class, we can simply use them in our widgets.
In the following example, we use them to print the title on the top of the app page, and a simple welcome message with a placeholder.
import 'package:flutter/material.dart';
import 'package:flutter_localizations/flutter_localizations.dart';

import 'localizations.dart'; // your previous file

class DemoApp extends StatelessWidget {
  @override
  Widget build(BuildContext context) {
    return Scaffold(
        appBar: AppBar(
          title: Text(AppLocalizations.of(context).title),
        ),
        body: Text(AppLocalizations.of(context).welcome("John")));
  }
}

class Demo extends StatelessWidget {
  @override
  Widget build(BuildContext context) {
    return MaterialApp(
        onGenerateTitle: (BuildContext context) =>
            AppLocalizations.of(context).title,
        localizationsDelegates: [
          AppLocalizations.delegate,
          GlobalMaterialLocalizations.delegate,
          GlobalWidgetsLocalizations.delegate,
        ],
        supportedLocales: AppLocalizations.delegate.supportedLocales,
        // Note: AppLocalizations.of()
        // will only find the app's Localizations widget if its
        // context is a child of the app.
        home: DemoApp());
  }
}

void main() {
  runApp(Demo());
}
When you want programmatically to change the current locale in your app, you can do it in the following way:
AppLocalizations.load(Locale('en', ''));
Step 4: Generate localization files
The code is now ready, but we miss localization files for languages we support. Flutter officially supports *.arb localization files.
Flutter offers a CLI tool that generates a default intl_messages.arb file by scanning your AppLocalizations class.
Create lib/l10n folder and run the following command from the project root:
flutter pub pub run intl_translation:extract_to_arb --output-dir=lib/l10n lib/localizations.dart
That arb file contains all key-value pairs we use in our Widgets.
Initially, we can copy the content of that file and put it into intl_de.arb file in the same directory, and just translate the values into the German language.
Once we are completed with translations, we should run the following command in order to generate *.dart files which our app will directly load:
flutter pub pub run intl_translation:generate_from_arb --output-dir=lib/l10n --no-use-deferred-loading lib/localizations.dart lib/l10n/intl_*.arb
Step 5: Run the app
You can now build and run your application.
Part 2: Managing your Flutter localizations
Managing a couple of strings in two languages? Sure, that's easy. But as you add more features and expand into more markets, your app will grow to include thousands of strings across dozens of languages. Here's how to automate your Flutter localization:
Step 1: Create a project in Localizely
Once you sign up to Localizely, just go to My projects page and tap “+” button (or explore the Sample Project if you wish to get more familiar with Localizely features first). Give your project a name, and set your main and other languages. You can change the main language later if needed.
Each project gets a unique ID (you can find it in My projects page), that is needed when using API.
Step 2: Upload your files
Import your main intl_messages.arb file to Localizely. Go to Upload page, select the file, and confirm. Alternatively, you can start by adding string keys in Localizely first.
Step 3: Invite team members
Localization work is a team effort. Switch to the Contributors section by clicking the icon in the side menu and start adding teammates. Any user can be granted admin privileges, i.e. the same rights on the project as you. For non-admin contributors, you can specify per-language access to the project specifying some languages as reference (read-only) or contributable (read and update). Only admins have access to string key changes, importing, exporting, settings, etc.
Step 4: Translate
Localizely has an editor on Translations page that reminds of Excel tables commonly used for translations management. Feel free to explore the Sample project or just take a look at Getting started guide to grasp the basic concept and options.
Step 5: Download the files
The translation part is done. How to get the localization data out of Localizely and make it usable in your Flutter app?
There are 2 options:
-
Option 1: Download manually
Click Download icon in your project side menu and select Flutter ARB as the exporting format. Click Download to get the file. Then move downloaded .arb file into your project replacing the existing localization, that’s all.
-
Option 2: Download via API
Depending on your project deployment setup, you may want to use Localizely API – it gives you a simple way to automatically generate and download localization files.
This workflow can be simplified further by using Flutter Intl plugin explained in this guide.
Like this article? Share it!
Zoran is a Software Engineer at Localizely. His primary interest is web development, but he also has a solid background in other technologies. For the last few years, he has been involved in the development of software localization tools.
Enjoying the read?
Subscribe to the Localizely blog newsletter for quality product content in your inbox.

Resources
- What is Localizely?
- Getting started
- Localization workflow
- Translation editor
- Flutter Over-the-Air updates
- Flutter In-Context Editing
- Project branching
- Professional translation services
- Machine Translation
- AI Translation
- Translation Memory
- Glossary
- Tasks
- Reports and statistics
- Figma integration
- AWS S3 integration
- GitHub integration
- GitLab integration
- Bitbucket integration
- CLI
- Configuration file
- Supported file formats
- Language & Country Codes
- Referral Program
- Affiliate Program
- I18N Questions
- FAQ
Free tools
- ICU message for translators
- ICU message editor
- Hreflang generator
- Hreflang checker
- JSON Flattener
- JSON Validator
- YAML Validator
- XML Validator
- CSV Validator
- Text Compare
- Text Encoding Converter
- Localization File Converter
- JSON Word Counter
- ARB Word Counter
- Translation Cost Calculator