Bitbucket Integration
Documentation
- What is Localizely?
- Getting started
- Localization workflow
- Translation editor
- Flutter Over-the-Air updates
- Flutter In-Context Editing
- Project branching
- Professional translation services
- Machine translation
- Translation memory
- Glossary
- Reports and Statistics
- Figma integration
- AWS S3 integration
- GitHub integration
- GitLab integration
- Bitbucket integration
- CLI
- Configuration file
- Supported file formats
- Language & Country Codes
- Referral Program
- FAQ
Introduction
The Bitbucket integration with Localizely allows you to easily sync your translation files between your Bitbucket repository and your Localizely project.
After setting up the integration, you can easily pull the files from Bitbucket using the Localizely web console. You can even automate the pull process through webhooks, which will automatically trigger whenever your development team pushes new code changes to Bitbucket.
Once your translations are complete, you can push them to Bitbucket by creating a pull request. This makes it simple and straightforward to keep your translations up-to-date and synced with your code.
Setup
1. Create localizely.yml file
To enable the Bitbucket integration with Localizely, you'll need to have a localizely.yml configuration file in your Bitbucket repository. This file tells Localizely which files to synchronize and defines which files to import (pull) from and export (push) to Bitbucket.
The following is a minimal configuration file for Flutter projects:
config_version: 1.0 # Only 1.0 available
project_id: c776c33e-f428-4c91-87e1-a6a18c1554fe # Your project ID from: https://app.localizely.com/projects
file_type: flutter_arb
upload:
  files: # List of files for upload to Localizely. Usually it is just one file used for the main locale
    - file: lib/l10n/intl_en.arb
      locale_code: en
download:
  files: # List of files for download from Localizely.
    - file: lib/l10n/intl_en.arb
      locale_code: en
    - file: lib/l10n/intl_de.arb
      locale_code: de
    - file: lib/l10n/intl_es.arb
      locale_code: es
For more detailed information on how to set up your Localizely configuration file, please refer to the documentation.
2. Create Bitbucket access token
To integrate Bitbucket with Localizely, you'll need to generate a repository access token from Bitbucket. Simply navigate to bitbucket.org and go to your repository's settings, then click on Access tokens. From there, you can create a new token and give it a name. Be sure to set the access token's scopes to include repository:write and pullrequest:write.
Alternatively, you can also use a workspace or project access token, but keep in mind that it will require the same level of permissions as the repository access token.
Once you have generated the access token, make sure to copy it.
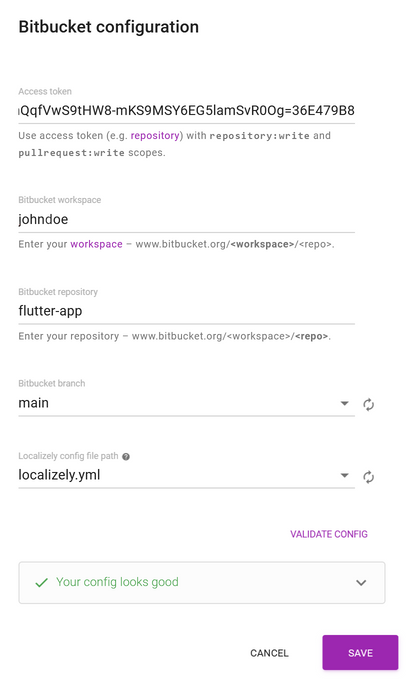
3. Connect your repository
Go to the settings for the Localizely project and select Bitbucket Integration under the Integrations section.
- Paste your Bitbucket access token you previously created.
- Enter the Bitbucket workspace you want to sync with Localizely.
- Enter the Bitbucket repository you want to sync with Localizely.
- Choose the repository branch you want to import (pull) from and export (push) to. Usually, this is the “main” branch.
- Click Validate Configuration to check if your access token and configuration file are set up correctly.
- Click Save.

Your access token is safe, it is stored in an encrypted form in our system.
Pulling files from Bitbucket
You can pull files from Bitbucket either manually or automatically. The following section will guide you through both options.
Manual Pull
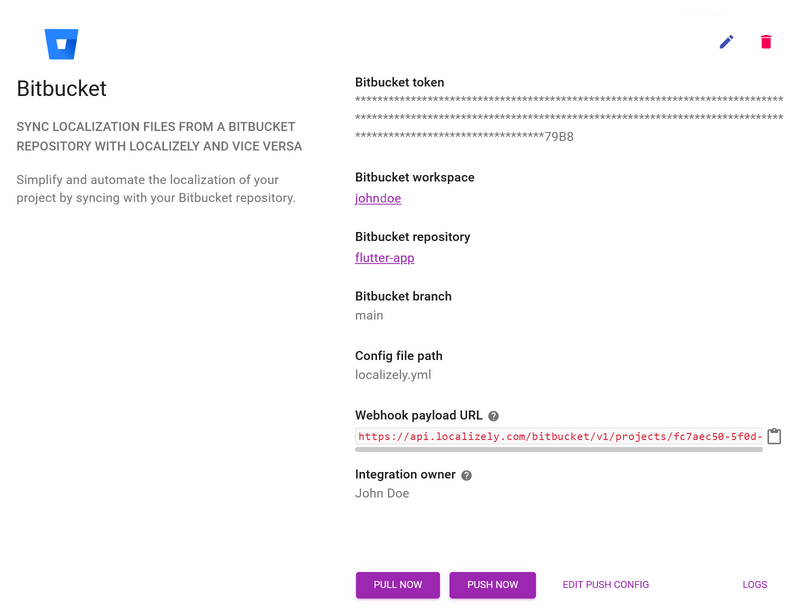
Go to Project Settings > Integrations > Bitbucket, and click the Pull now button.

Auto-Pull
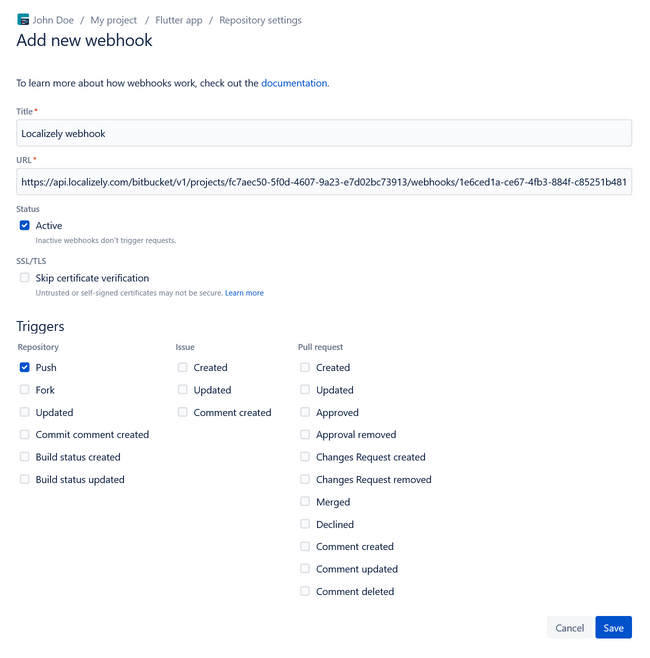
After you've set up the pull functionality, it's a good idea to automate the process by setting up a webhook in Bitbucket. This will ensure that any changes you make in Bitbucket are automatically pulled into Localizely.
To create a webhook, simply navigate to your repository's settings in Bitbucket and go to Webhooks. From there, you can create a new webhook by pasting the Webhook payload URL provided in the Localizely integration configuration. With this webhook in place, you can ensure that your translations are always up-to-date and in sync with your code changes.

Pushing files to Bitbucket
Once your translations are complete, simply go to Project Settings > Integrations > Bitbucket in Localizely and click the Push now button.
This will initiate the following actions:
- A new branch will be created from the last revision of the branch selected during the integration setup. The new branch will be named in the following format:
localizely_YYYY-MM-DD_HH-MM-SS. - A commit will be made with the updated translation files in the new branch.
- A pull request will be created from the new branch to the previously selected branch.
At this point, you can review and merge the pull request in Bitbucket. This will ensure that your translations are pushed back to Bitbucket and integrated into your codebase seamlessly.
Frequently Asked Questions (FAQ)
How to link Localizely project to multiple git repositories?
One Localizely project can be directly linked to one Bitbucket repository via this integration. However, you can use other integrations such as CLI or REST API to link with additional repositories.
Previous: GitLab integration
Read next: CLI
Tired of manually editing translation files?
Our platform streamlines software localization for you.
Documentation
- What is Localizely?
- Getting started
- Localization workflow
- Translation editor
- Flutter Over-the-Air updates
- Flutter In-Context Editing
- Project branching
- Professional translation services
- Machine translation
- Translation memory
- Glossary
- Reports and Statistics
- Figma integration
- AWS S3 integration
- GitHub integration
- GitLab integration
- Bitbucket integration
- CLI
- Configuration file
- Supported file formats
- Language & Country Codes
- Referral Program
- FAQ
Resources
- What is Localizely?
- Getting started
- Localization workflow
- Translation editor
- Flutter Over-the-Air updates
- Flutter In-Context Editing
- Project branching
- Professional translation services
- Machine translation
- Translation Memory
- Glossary
- Reports and statistics
- Figma integration
- AWS S3 integration
- GitHub integration
- GitLab integration
- Bitbucket integration
- CLI
- Configuration file
- Supported file formats
- Language & Country Codes
- Referral Program
- I18N Questions
- FAQ