Flutter In-Context Editing
Instantly see how your translations fit on a real device while you type
Documentation
- What is Localizely?
- Getting started
- Localization workflow
- Translation editor
- Flutter Over-the-Air updates
- Flutter In-Context Editing
- Project branching
- Professional translation services
- Machine Translation
- AI Translation
- Translation Memory
- Glossary
- Tasks
- Reports and Statistics
- Figma integration
- AWS S3 integration
- GitHub integration
- GitLab integration
- Bitbucket integration
- CLI
- Configuration file
- Supported file formats
- Language & Country Codes
- Referral Program
- Affiliate Program
- FAQ
The limited screen size of mobile devices often makes it challenging to ensure text in multiple languages fits perfectly on the first attempt. Manually rebuilding apps to check if updated text fits into its designated space can be tedious and time-consuming. Fortunately, Localizely simplifies this process with its In-Context Editing feature for Flutter apps.
With Localizely, you can enter translations directly into the platform and instantly preview how the text appears on your device or in a browser. This allows you to quickly identify issues such as text overflow, unwanted line breaks, or layout disruptions. By viewing translations in context and understanding how they integrate with the app, you can also significantly improve translation quality.
That said, it’s important to note that In-Context Editing is not a replacement for traditional translation methods. Instead, it serves as a powerful enhancement to the standard process, boosting productivity. This feature is specifically designed for use during development and testing phases, as any translation changes made through this method are only visible while connected to the platform.
Integration
The most commonly used approach for localizing Flutter apps involves utilizing the intl package and its associated tools, which generate the necessary localization code. In the sections below, we will explain how to integrate In-Context Editing, into Flutter projects that follow this approach.
Not long ago, Flutter introduced the gen_l10n tool as a new approach to localization. This tool automatically generates the necessary localization files during the build process. We have already covered how to configure localization using the gen_l10n tool, so we won’t go into further detail on that here. Instead, we will focus on demonstrating how to enable In-Context Editing in such projects.
The sample Flutter app featuring In-Context Editing integration is available on the GitHub repository.
Step 1: Update pubspec.yaml file
The first step is to add the localizely_sdk dependency to your project.
Open your pubspec.yaml file and include the following dependency:
dependencies:
  flutter:
    sdk: flutter
  flutter_localizations:
    sdk: flutter
  intl: any
  localizely_sdk: ^2.6.4
After adding the dependency, save the file and run the following command to download it:
flutter pub getStep 2: Generate localization file
The next step is to generate the necessary localization file using the localizely_sdk.
To do this, run the following command:
dart run localizely_sdk:generateNote: In Flutter 3.22.0, running the command dart run localizely_sdk:generate may produce false analyzer errors. This issue has been resolved in Flutter 3.22.1. If you need to use 3.22.0 and encounter these errors, running flutter pub get again should fix the problem.
To automatically trigger code generation whenever your .arb files are modified, add the build_runner package to your dev_dependencies and run the watch command:
flutter pub add build_runner -d
flutter pub run build_runner watch
Once the required localization file is generated, update the localizationsDelegates and supportedLocales properties of the MaterialApp widget.
...
import 'package:flutter_gen/gen_l10n/localizely_localizations.dart';

class MyApp extends StatelessWidget {
  ...

  @override
  Widget build(BuildContext context) {
    return MaterialApp(
      ...
      localizationsDelegates: LocalizelyLocalizations.localizationsDelegates,
      supportedLocales: LocalizelyLocalizations.supportedLocales,
      ...
    );
  }
}
Step 3: Wrap the root of the app
The next step involves wrapping the root of the app with the LocalizelyInContextEditing widget. To achieve this, update the main.dart file as follows:
...
import 'package:localizely_sdk/localizely_sdk.dart';

void main() {
  runApp(
    LocalizelyInContextEditing(
      enabled: true, // set to false to disable In-Context Editing for production app builds
      child: MyApp(),
    ),
  );
}

...
Step 4: Connect your app with Localizely
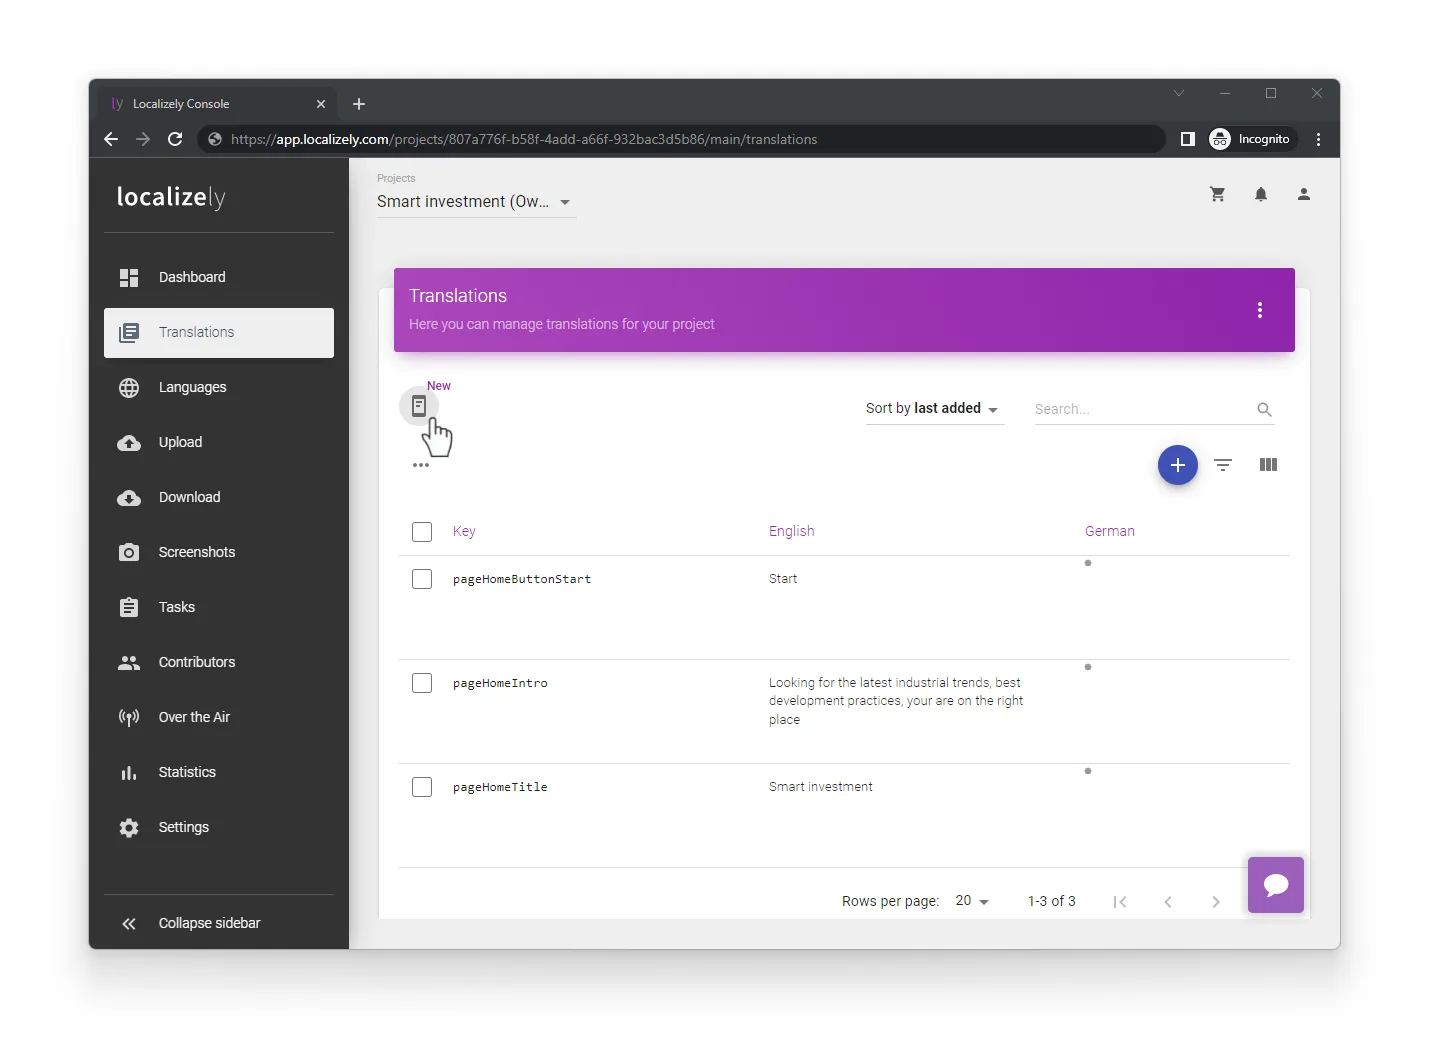
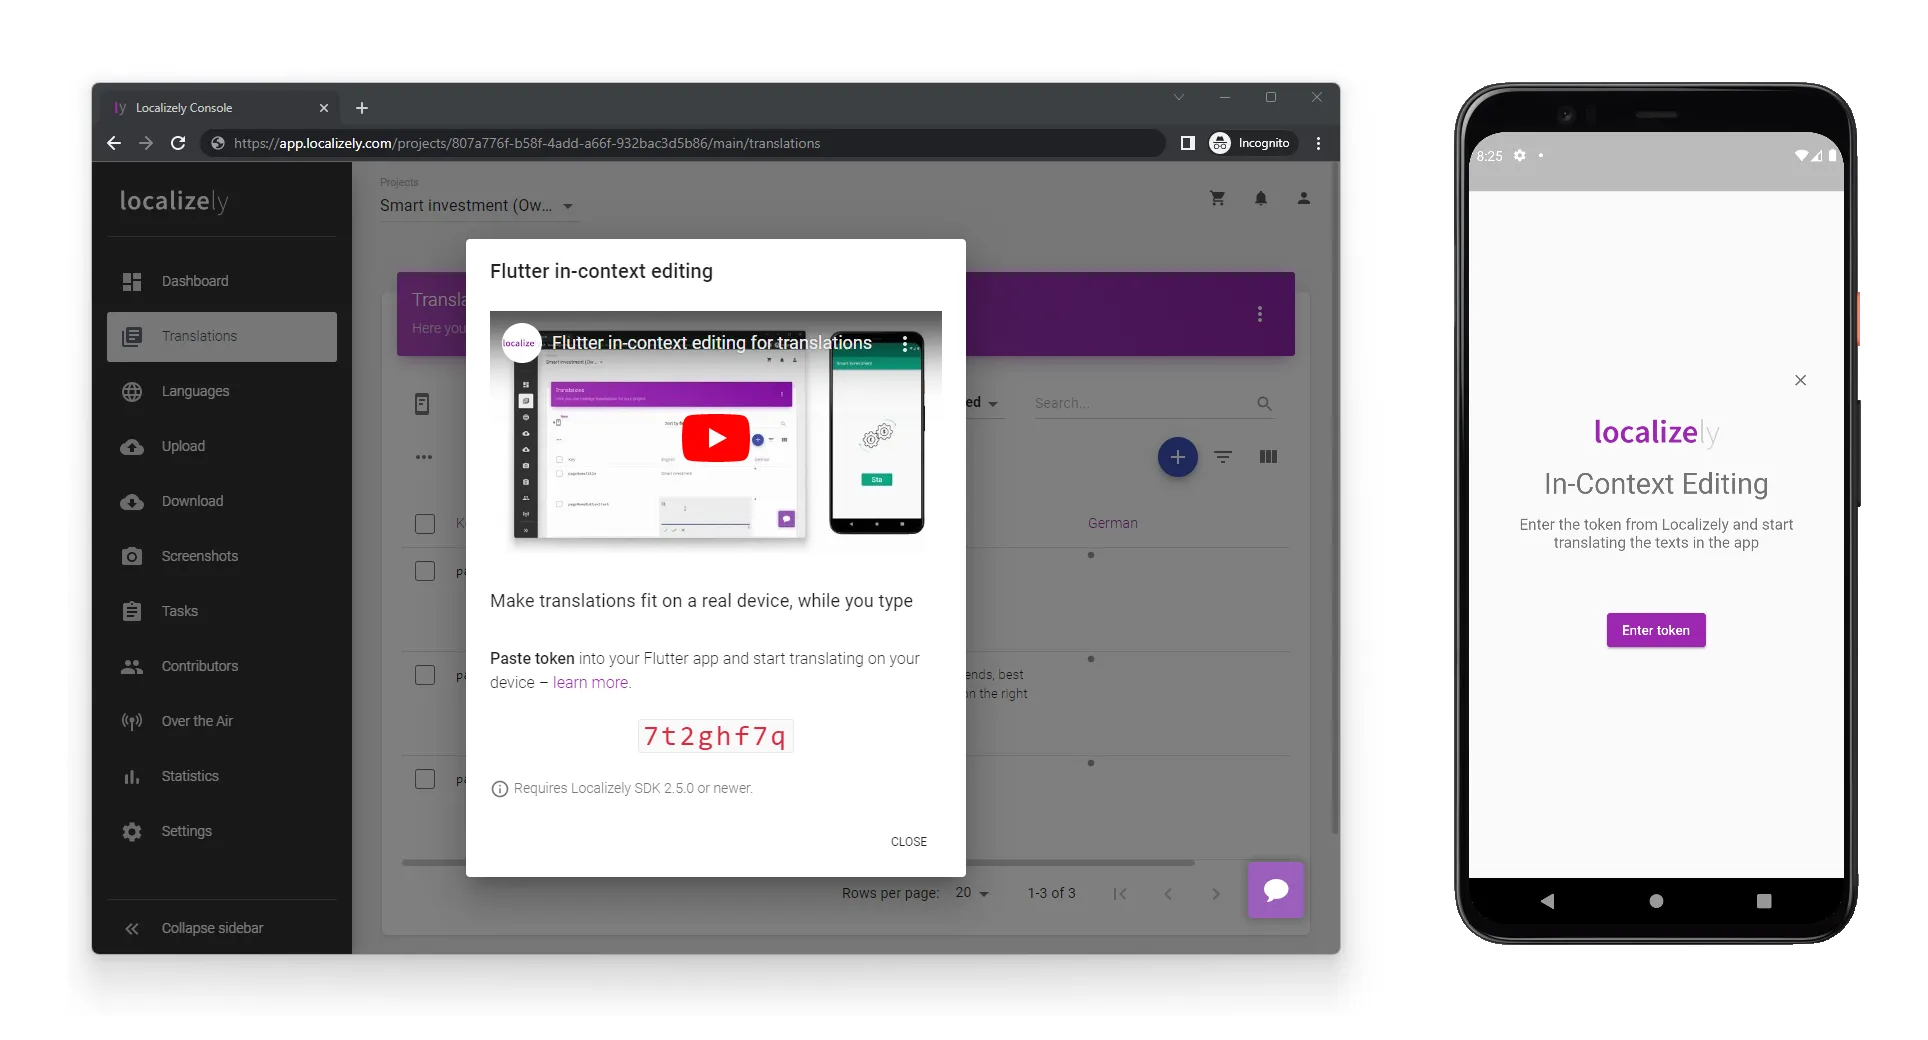
The final step is to run your app and establish a connection with Localizely. Upon launching the app, you will be directed to a page that guides you through the connection process. Essentially, you will need to enter a token from Localizely to establish the connection.
To retrieve the token, navigate to the Translations page of your project on the Localizely platform and click on the button. This will open a dialog containing all the necessary details, including your token.
Once you have everything set up, proceed to connect your app.
If everything went well, you should see a confirmation message indicating that your app is now connected to Localizely.
Note: The localizely_sdk >=2.4.0 <2.5.0 requires an update of min platform versions:
- Android: Required Android SDK 21 or newer (update minSdkVersion to 21 in the android/app/build.gradle file).
- iOS: Required iOS 11 or newer and an update of the Info.plist file with the NSCameraUsageDescription.
As of version 2.5.0, these updates are no longer required due to changes in implementation.
Note: The localizely_sdk >=2.4.0 <2.5.0 uses the QR code scanner on mobile apps to connect. This way of connecting is abandoned. In case you are prompted to scan the QR code, please update the localizely_sdk to the latest available version.
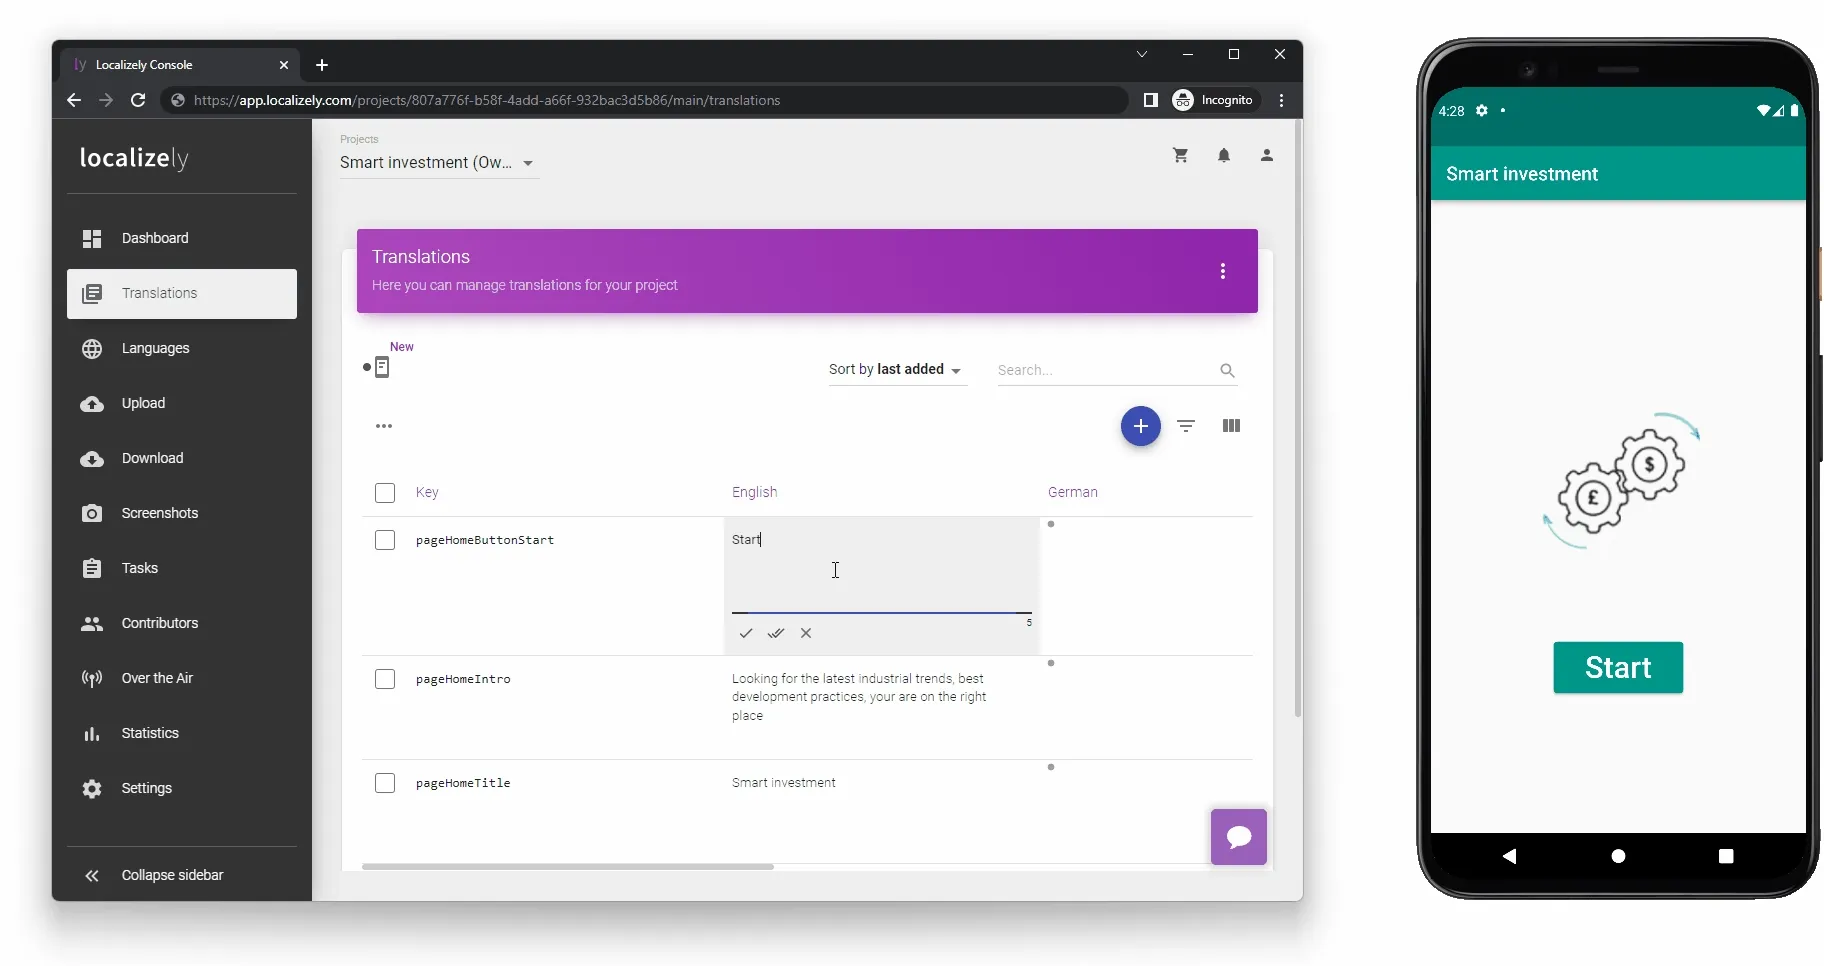
Step 5: Translate
Now, you can begin translating your content directly on the Localizely platform. As you type, you’ll be able to see how the translations look and fit on a real device in real time.
The Flutter Intl is an IDE plugin that generates the necessary boilerplate code for the intl package. We have already explained how to configure localization with the Flutter Intl plugin. Therefore, we will not spend more words on that. Instead, this guide will focus on enabling In-Context Editing in such projects.
The sample Flutter app featuring In-Context Editing integration is available on the GitHub repository.
Step 1: Update pubspec.yaml file
The first step is to add the localizely_sdk dependency to your project.
Open your pubspec.yaml file and include the following dependency:
dependencies:
  flutter:
    sdk: flutter
  flutter_localizations:
    sdk: flutter
  intl: any
  localizely_sdk: ^2.6.4
After adding the dependency, save the file and run the following command to download it:
flutter pub getNext, update the flutter_intl configuration in the pubspec.yaml file to include ota_enabled. This will allow the Flutter Intl plugin to generate the necessary metadata.
flutter_intl:
  enabled: true
  localizely:
    ota_enabled: true
Step 2: Wrap the root of the app
The next step involves wrapping the root of the app with the LocalizelyInContextEditing widget. To achieve this, update the main.dart file as follows:
...
import 'package:localizely_sdk/localizely_sdk.dart';

void main() {
  runApp(
    LocalizelyInContextEditing(
      enabled: true, // set to false to disable In-Context Editing for production app builds
      child: MyApp(),
    ),
  );
}

...
Step 3: Connect your app with Localizely
The final step is to run your app and establish a connection with Localizely. Upon launching the app, you will be directed to a page that guides you through the connection process. Essentially, you will need to enter a token from Localizely to establish the connection.
To retrieve the token, navigate to the Translations page of your project on the Localizely platform and click on the button. This will open a dialog containing all the necessary details, including your token.
Once you have everything set up, proceed to connect your app.
If everything went well, you should see a confirmation message indicating that your app is now connected to Localizely.
Note: The localizely_sdk >=2.4.0 <2.5.0 requires an update of min platform versions:
- Android: Required Android SDK 21 or newer (update minSdkVersion to 21 in the android/app/build.gradle file).
- iOS: Required iOS 11 or newer and an update of the Info.plist file with the NSCameraUsageDescription.
As of version 2.5.0, these updates are no longer required due to changes in implementation.
Note: The localizely_sdk >=2.4.0 <2.5.0 uses the QR code scanner on mobile apps to connect. This way of connecting is abandoned. In case you are prompted to scan the QR code, please update the localizely_sdk to the latest available version.
Step 4: Translate
Now, you can begin translating your content directly on the Localizely platform. As you type, you’ll be able to see how the translations look and fit on a real device in real time.
Previous: Flutter Over-the-air updates
Read next: Project branching
Tired of manually editing translation files?
Our platform streamlines software localization for you.
Documentation
- What is Localizely?
- Getting started
- Localization workflow
- Translation editor
- Flutter Over-the-Air updates
- Flutter In-Context Editing
- Project branching
- Professional translation services
- Machine Translation
- AI Translation
- Translation Memory
- Glossary
- Tasks
- Reports and Statistics
- Figma integration
- AWS S3 integration
- GitHub integration
- GitLab integration
- Bitbucket integration
- CLI
- Configuration file
- Supported file formats
- Language & Country Codes
- Referral Program
- Affiliate Program
- FAQ
Resources
- What is Localizely?
- Getting started
- Localization workflow
- Translation editor
- Flutter Over-the-Air updates
- Flutter In-Context Editing
- Project branching
- Professional translation services
- Machine Translation
- AI Translation
- Translation Memory
- Glossary
- Tasks
- Reports and statistics
- Figma integration
- AWS S3 integration
- GitHub integration
- GitLab integration
- Bitbucket integration
- CLI
- Configuration file
- Supported file formats
- Language & Country Codes
- Referral Program
- Affiliate Program
- I18N Questions
- FAQ
Free tools
- ICU message for translators
- ICU message editor
- Hreflang generator
- Hreflang checker
- JSON Flattener
- JSON Validator
- YAML Validator
- XML Validator
- CSV Validator
- Text Compare
- Text Encoding Converter
- Localization File Converter
- JSON Word Counter
- ARB Word Counter
- Translation Cost Calculator